Friday, October 28, 2005

Now These Are Movies!

A few days ago I posted how to make quick, easy animations right in Civil 3D 2006.

Well, here is the other end of the spectrum. Scott McEachron, The D.C. CADD Company - Dallas posted as a comment the link to a website that has some spectacular animations. Michael Hulme's Multimedia Resume Addendum (click here) contains two animations. They are listed as "LATEST SIMULATION EXAMPLES". These are eye-popping "Must Sees".

Who would not want to have toys,... I mean models like that.

Thanks Scott, and Thanks to Michael for creating such cool stuff.

Wednesday, October 26, 2005

Making Movies


It is simple to make animations within Civil 3D. I have done so with the following steps.

1. Create a 3D Polyline with various methods.
or
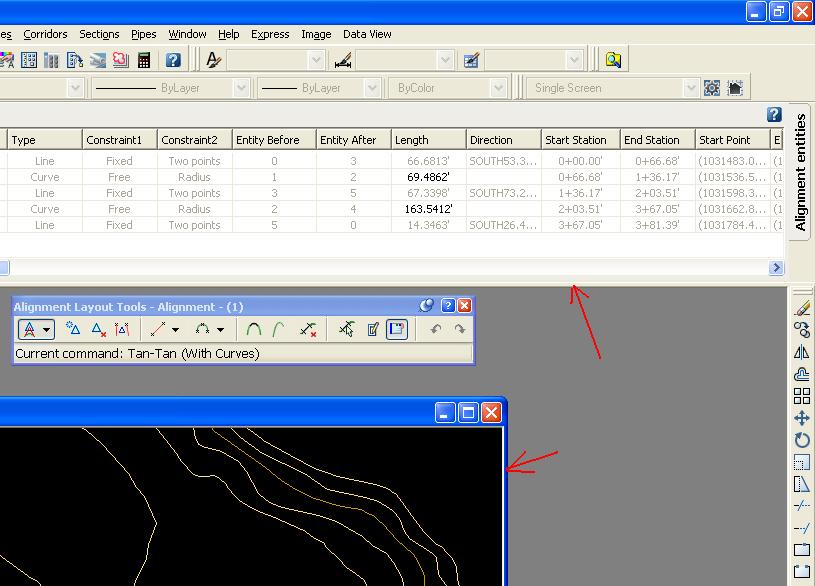
1. Corridors > Export > Corridor Feature Line as Polyline (Creates a 3D Polyline)

2. Edit the newly created 3D Polyline (this will be used as the path for the Camera. I tend to raise or lower it depending upon my intention)
3. General > Camera > Add Camera (attach it to end of Pline)
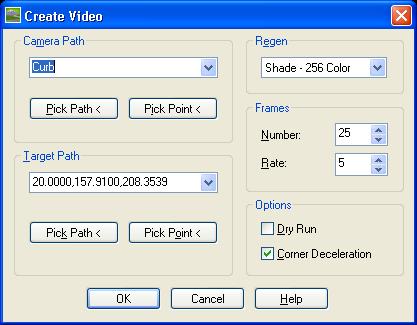
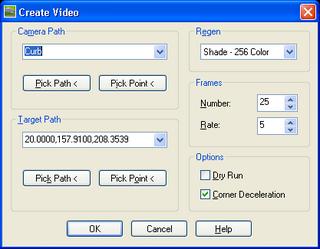
4. General > Camera > Create Video (Very simple to use. See image. Press "Help" button for specifics)(Select a Path & Target. Etc.)
5. Press OK button
6. Name and Select location for animation
7. Select Compressor (I like the TechSmith Screen Capture Codec if available)
8. It prompts if "...you wish to play the video now?"

That is all it takes.

Note: If you learned to make a movie from this post, I would be honored if you would share it with me. send to:

angelatketivtechdotcom (Re-formatted for spam reasons). Some may be to large to email.

Spielberg beware.

Monday, October 24, 2005

Improving Civil 3D Performance by Adsk

The following information is straight from the Autodesk Knowledge Base about Civil 3D 2006. It offers suggestions on how to improve performance with Civil 3D 2006.

1. Disable the Rebuild Automatic option for Surfaces and Corridors.
2. Change styles to limit the objects displayed in the drawing.
3. Use data shortcuts to reduce the amount of data in a working drawing.
4. Copy project files located on a network drive to a local drive.
5. Use the Cache model tab and the all layout tabs option on the System tab in the Options dialog box.
6. Increase Autosave timings on the Open and Save tab in the Options dialog box.
7. Change the value of the INDEXCTL variable to 0 (zero).
8. Turn off the Dynamic Input methods and selection previews.

The title of this post takes you right to the actual document.

DWG TrueView it is Free

Recently posted on the Autodesk website is DWG TrueView. This is the FREE DWG Viewer that many others had mentioned in blogs and discussion groups. It was finally released.

It is a stripped down version of AutoCAD. It gives users the ability to open .DWG and .DXF files. Additionally, users can Zoom & Pan, switch between layouts and model space, turn Layers or Views on/off, Plot files, and Publish to DWF.

Owners of Composer had a similar viewer under a different name.

DWG TrueView is avialable for free download from the Autodesk website. Click on the title of this post to get there.

Sunday, October 23, 2005

C3 Visits Autodesk

C3 the Civil CADD Consortium spent a few days up in San Rafael with Autodesk. This was time very well spent and demostrates the value of the Consortium.

C3 allows member companies to collaborate on solutions to challenges and brings a larger voice when addressing needs and desires with Autodesk.

I believe all attendees valued this visit. I know I did.

Note: I sat next to Dave Simeone at dinner Thursday evening. It was nice getting to know him better. Thanks Dave.

Friday, October 14, 2005

Map 3D Mini Demonstrations

Not all Civil 3D users know that it is built on top of Map 3D which itself is built on top of AutoCAD. This means that the capabilities of Map 3D are available to Civil 3D users.

For those users that do not know much about Map 3D the title of this post is linked to an Autodesk webpage that contains ten 1-3 minute mini demonstrations showing some of the Map 3D capabilities. Two that are of particular interest are:

Drawing Cleanup
3D Surfaces

Drawing Cleanup because it can greatly increase the users ability to fix drawings with errors, and 3D surfaces because Map 3D surfaces are the same as Civil 3D surfaces.

If nothing else a user should know about the bells and whistles even if they will never use them. Although, with some progressive thinking and a little bit of initiative users may see the usefulness for a whistle here or a bell there.

Thursday, October 13, 2005

Lost and Found: Panorama Window and it's Vistas

It is interesting how things occur in clumps. Coincidence? Conspiracy? Anyways, It was curious a few days ago when several users posted to discussion groups about the following issue and I received a phone call and an e-mail about the same thing.

Scenario: A user attempts to edit an alignment via the align grid view or edit a point. Both of these actions should open the "Panorama" window. The user should then see different tabs (Vistas) for the editor that they requested. Instead nothing appears to happen and the user is unable to proceed as intended.

Solution: The Panorama window was unintentionally docked. To undock it and make it visible the user should...


Unmaximize the drawing window. The "Panorama" window will be visible. Undock "Panorama" Window. Maximize drawing window.


Perhaps it was just a coincidence.

Friday, October 07, 2005

Autodesk University 2005 Reminder


It is now less than 2 months until AU-2K5. I am told that it is becoming the largest one ever! Can you imaging around 4000 attendees in around 400 classes.

The title of this post links you to the registration page. Check it out. You can see the classes and instructors.

By the way, the class I am instructing is CV22-2 on Tuesday Nov. 29th from 5:00 pm - 6:30pm. It is titled "Autodesk® Civil 3D® Corridors: Cul-de-Sacs Are Not a Dead End". If you are attending please say hello.

Just For Fun: What Do You See?


Now look closely.


Created with Toogle

Thursday, October 06, 2005

Earthwork Quantities


There are two primary ways to get Earthwork Volumes between two surfaces. One method involves the creation of a third surface the other just gives you the values of Cut and Fill.

The first image shows the "Create Surface" dialog box. Here we can either create a "Tin Volume Surface" or a "Grid Volume Surface". Either will prompt us for a "Base Surface" and "Comparison Surface". Once created we select the properties of the "Volume Surface". On the "Statistics" tab we can see the Cut and Fill Values (unadjusted)(see image below).


The other method I posted about on Dec 15, 2004. This is a repeat of what I said...

When it comes to doing earthwork volume calculations Autodesk Civil 3D 2005 (now 2006 of course) makes the entire process very streamlined.

The process boils down to initiating the "ReportSurfaceVolume" command, from one of the various methods, then telling the software I wish to do a new calculation. Lastly, I select the two surfaces that I wish to compare. The Panarama window instantly provides the results. These results include the "Cut", "Fill", and "Net".

The software uses the composite method for the calculations. Civil 3D Help explains this method as "...using the points from both surfaces, as well as any location where the triangle edges between the two surfaces cross. The new composite surface elevations are calculated based on the difference between the elevations of the two surfaces."

Monday, October 03, 2005

Tooltip Accuracy


Most Civil 3D users have encountered the tooltips. You just hover over or near a Civil 3D object and you get information related to the object(s) such as elevation, Station, Offset, at the location of the crosshairs. Some users have occasionally asked how do I get this information at an exact location?

This is one option:

Type SNAPBASE.
Use an OSNAP to select the desired location.
Now, make sure SNAP is now on and Hover at desired location.
When done set SNAPBASE back to 0,0

Note: Setting snap to 10 or higher will guarantee you remain at the desired location without wandering.

I will post about managing tooltips at another time.