In Autodesk Civil 3D 2006 there are a couple of commands available from the right-click (shortcut) menu that I find useful. They are Quick Select (QSELECT) and Select Similar (SELECTSIMILAR).
Quick Select: allows you to use object properties or object types to include objects in a selection set, or to exclude them. In other words, I can search for any property of any object type and select EVERY object that satisfies the search. This is similar to the old filter command.
QSELECT is commonly used in conjuction with the Propeties Palette which would then allow you to modify the objects just selected.
SELECTSIMILAR: To use this command, select a single object, then right-click and choose SELECTSIMILAR this would select ALL objects of the SAME type on the SAME layer.
This likewise, is commonly used with the Properties Palette.
Most of next week I will be out of town providing training and should be back next Friday. Until then have a Safe and Happy New Year!
Friday, December 30, 2005
Thursday, December 29, 2005

Thursday, December 22, 2005
3DDWFPublish and Transparent Surfaces
Here are a couple of things that may brighten someone's Christmas.
First, the 3DDWFPUBLISH command allows us to create a Design Web Format (DWF) file of our three-dimensional models. The process is quick and easy.
Second, in Autodesk DWF Viewer or Autodesk DWF Composer when you look at a 3D DWF you can choose components and either "Hide" them or make them "Transparent". This can be useful when needing to see a pipe network. Just make the surface transparent.
Happy Holidays!
Friday, December 16, 2005
AU Online for Subscription Clients
I do not know if Autodesk Subscription clients have been notified. But, if you have not visited your Subscription Center lately, you may wish to do so. Why?
Autodesk has made available 100 recorded Autodesk University sessions and the complete collection of AU .PDF's to all Subscription clients.
Knowledge without the trip to Orlando.
More Knowledge. More Knowledge. MORE KNOWLEDGE!
Autodesk has made available 100 recorded Autodesk University sessions and the complete collection of AU .PDF's to all Subscription clients.
Knowledge without the trip to Orlando.
More Knowledge. More Knowledge. MORE KNOWLEDGE!
Styles PDF
For those of you that did not make it to Autodesk University, you may want to check out the following.
James Wedding has posted in the Discussion Groups the 17 page handout (.PDF) from his AU class titled "House of Style". It is a very good source of information pertaining to styles. The last page alone, which indicates where certain items in a typical profile (with pipes) are controlled from, is worth the effort to locate and download this document.
The title of this post is linked to the document. Once open File > Saveas to save it to your system.
Thanks again James for making everyone better.
Tuesday, December 13, 2005
Autodesk Blog Survey
The title of this post is linked to a survey that Autodesk is conducting regarding Blogs and Blogging. I found mention of it at Shaan Hurley's Blog.
There are many blogs, this one included, that Autodesk is asking for input about.
If you have a moment, you may wish to participate in the survey. Simply click the title of this post to begin the survey.
There are many blogs, this one included, that Autodesk is asking for input about.
If you have a moment, you may wish to participate in the survey. Simply click the title of this post to begin the survey.
I'M BACK!
Well, today I am at my desk for the entire day. This is after being away for the majority of the last three weeks.
In the near future I hope to share the items I learned at Autodesk University, what I taught at Autodesk University, and what I learned while at Autodesk Headquarters (nothing confidential, so I can share).
It is good to be back.
In the near future I hope to share the items I learned at Autodesk University, what I taught at Autodesk University, and what I learned while at Autodesk Headquarters (nothing confidential, so I can share).
It is good to be back.
Sunday, December 04, 2005
Zoomfactor
Most people know this, but, not everyone. There is a system variable that controls how much the zoom magnification changes with each click of the mouse wheel forward and backward.
When the Civil 3D is installed the system variable ZOOMFACTOR is set to the default value of 60. For civil engineering drawings, where the smallest object is considerably smaller than the entire drawing, users may find that setting this variable to it's maximum value of 100 may serve them best.
When the Civil 3D is installed the system variable ZOOMFACTOR is set to the default value of 60. For civil engineering drawings, where the smallest object is considerably smaller than the entire drawing, users may find that setting this variable to it's maximum value of 100 may serve them best.
Saturday, December 03, 2005
Disneyland
Announcers voice:
"Angel Espinoza, you just taught your first Autodesk University class what are you going to do now?"
"I'm Going to Disneyland!"
Yes, you read correctly. Even though I was just around the corner to Disney's Magic Kingdom (Orlando). I flew home 3,000 miles to attend Disneyland (Anaheim) with my family on Friday.
Monday I leave for San Rafael (Autodesk's HQ) to learn more about implementing Civil 3D. I return Friday night.
Wednesday, November 30, 2005
AU 2005 Class
I taught my first Autodesk University class yesterday evening. The subject was creating Knuckles and Cul-de-Sacs. There were approximately 200 attendees.
I had been under the weather in the days prior. So I was a little concerned.
The class went well. The attendees asked great questions, and they seemed very engaged. I thoroughly enjoyed the whole experience. It could not have asked for more out of my first class.
Thank you to all attendees and speakers for your encouragement and comments.
Maybe next year, I will get the opportunity to do more than one class.
Sunday, November 27, 2005
More Web Milestones
This week was one of a couple of milestones.
Early in the week, the visitor from the 130th country checked this blog.
Within the last day or two, the 30,000th visitor since January 1st dropped by.
Thank you all for visiting and/or commenting.
Early in the week, the visitor from the 130th country checked this blog.
Within the last day or two, the 30,000th visitor since January 1st dropped by.
Thank you all for visiting and/or commenting.
Live from Orlando
Well, I have arrived in Orlando for Autodesk University 2005. I am checked in, and about to go exploring.
My class is Tuesday evening and currently has just under 200 registered attendees.
I'll be back soon.
My class is Tuesday evening and currently has just under 200 registered attendees.
I'll be back soon.
Thursday, November 17, 2005
Discussion Groups
For those of you that may not be aware, online Discussion Groups allow participants to "discuss" the topic of that particular "group". Autodesk has for many years hosted discussion groups for many of their products.
This allows users of these products to post question or problems, provide answers to others, present wish list items for consideration, and the ability to network.
There are a couple of ways that one can view the discussion groups. The first method is to use an internet browser. The title of this post is linked to the online discussion group for Autodesk's Civil 3D. Another method is to use a news reader such as Outlook Express. This method allows you to find, view and download for offline viewing, conversations (threads). It also allows you to mark those that are of particular interest.
The most important aspect of discussion groups is that they bring together users from around the world. We can either gain by their answers to our questions or learn from the issues that they may be having. Oh, and of course that all of this information can be searched to address our needs.
The Civil 3D discussion group is a FANTASTIC way to keep abreast of the product. The increased volume of discussion within this group is a clear indicator of the increased interest and use of Civil 3D. Best of all it is FREE.
Note: After monitoring these discussion groups for a period of time you may notice that some post'ers comments are more useful than others. Look for Autodesk'ers like Dave Simeone - Civil 3D Product Manager, and Dan Philbrick - Civil 3D Engineering Manager. James Wedding's comments, among many other's, are also very helpful.
We owe a debt of gratitude to all who contribute their knowledge, and time, and by doing so, make the entire user community BETTER!
Out of Town. What again?
I will be away for most of the next three weeks. I will first be attending a family reunion in Mexico. I will then be at Autodesk University (my class is approaching 200 attendees). Lastly, I will be spending a week at Autodesk (San Rafael) to learn more.
I will attempt to post as I have time and access.
I will attempt to post as I have time and access.
Friday, November 11, 2005
Knowledge Sources
Where does one go to learn about Autodesk Civil 3D 2006? Here is a quickly generated list in no particular order.
In the Box
1. Civil 3D 2006 Help (free in the box)
2. Civil 3D 2006 Tutorials (free in the box)
3. Civil 3D 2006 Getting Started Guide (free in the box in PDF form)
Books
1. Civil 3D 2006 Autodesk Official Training Courseware (AOTC) (SRP $75)
2. Digging Into Autodesk Civil 3D 2006 book - by Rick Ellis (SRP $75)
3. Harnessing Autodesk Civil 3D 2006 book - by Phillip J. Zimmerman (SRP $64.95)
Internet
1. Autodesk Civil 3D Products Page (free website)
2. Autodesk Civil 3D White Papers (free)
3. Weekly webcasts (free)
4. Subscription site e-Learning (20 lessons)
5. AUGI Forums (free website)
6. AUGI Training Program (ATP) (free website)
7. Autodesk University handouts previous years (from AUGI website)
8. Autodesk University handouts (current AU atendees)
9. Cad Digest Civil 3D Reading Room (free website)
10. Angel's Civil 3D Thoughts (This Blog)
11. Civil 3D - Paving the Way (Blog by Scott McEachron)
12. Online Discussion Groups
DVD's
1. Infrastructure Solutions Webcast DVD I (free)
2. Infrastructure Solutions Webcast DVD II (free)(subscription exclusive)
3. Civil 3D 2005 in a Nutshell, the Movie, Volume One - The Fundamentals (SRP $99)
Training
1. Autodesk University 2005 (Nov. 28-Dec. 1 Orlando, Florida)
2. Reseller provided training (some consider this to be most effective)
Note: If I left anything out please let me know.
Thursday, November 10, 2005
Civil 3D Webcasts DVD Part Deux
Today, Autodesk made available the second Civil 3D Webcasts DVD exclusively for subscription owners.
If you have any Autodesk product on subscription, you should visit the subscription center to place your order for the new DVD.
This DVD contains over 20, approximately 60 minute, webcast sessions. These sessions were recorded from February (where the last DVD left off) through July of 2005.
This is an exclusive offer to subscription customers valid until January 15, 2006.
Wednesday, November 09, 2005
Hot Fix 2 Available!
Hot Fix 2 is now available. It fixes a few items related to:
Pipe networks
grading to Surfaces from shortcuts
labeling Alignments from shortcuts
Select the title of this post to get to download page.
Pipe networks
grading to Surfaces from shortcuts
labeling Alignments from shortcuts
Select the title of this post to get to download page.
Tuesday, November 08, 2005
DWG TrueConvert
Released yesterday this NEW utility allows users to convert any previous DWG format to AutoCAD release 14, 2000, or 2004 DWG formats.
The primary difference between DWG TrueConvert and the previous batch drawing converters is that you no longer have to have an AutoCAD based software installed on your computer in order to do the conversion.
Because DWG TrueConvert uses the same DWG engine as AutoCAD it creates the same results as the SAVEAS command.
Special consideration should be taken for drawings that contain custom objects (read Civil 3D drawings) when they are converted to older versions. If no preparation is done custom objects will be represented by proxy graphics (assuming proxygraphics was turned on originally).
It may be desireable to use the EXPORTTOAUTOCAD2004 or EXPORTTOAUTOCAD2000 commands in Civil 3D 2006 to produce a drawing that contains only AutoCAD objects before conversion.
Note: DWG TrueConvert should not be used to convert older drawings with custom objects to a newer version. Because custom objects are NOT addressed by DWG TrueConvert unexpected results may occur when this scenario is persued.
Thursday, November 03, 2005
Stating the Obvious
Everywhere one looks nowadays civil engineering companies are looking to hire staff to fulfill the demand in the industry. As a matter of fact many companies are finding that the quickest way to fill the shortage of employees is to buy another firm. Which obviously does not solve the problem for the industry.
In general, civil engineering positions are readily available and companies are competing to attract new hires.
Sadly, the shortage of new hires appears that it will only get worse. As baby boomers begin to reach retirement age this will further stress the industry.
Why do I mention this? It has certainly been a lot on my mind lately as we have been getting more and more clients that inquire if we know of any available prospects. While at the same time we have job openings and are attempting to hire also.
Back to my point. Companies are finding that they have to do more with their existing staffs. This is being addressed with increased user training and the use of "NEW" tools like Civil 3D.
Properly applied Civil 3D can provide companies the ability to accomplish more, better, with less.
The title of this post is linked to a site that offers information to new graduates in civil engineering. While some of the information is slightly dated. It is no less relevent.
Friday, October 28, 2005
Now These Are Movies!
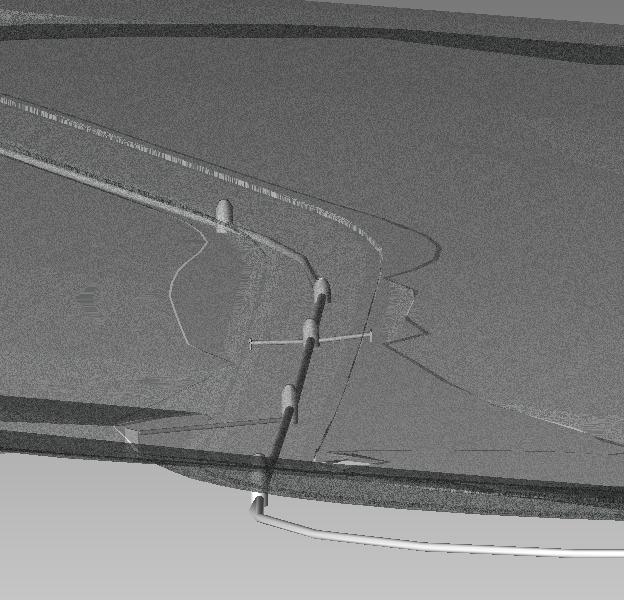
A few days ago I posted how to make quick, easy animations right in Civil 3D 2006.
Well, here is the other end of the spectrum. Scott McEachron, The D.C. CADD Company - Dallas posted as a comment the link to a website that has some spectacular animations.Michael Hulme's Multimedia Resume Addendum (click here) contains two animations. They are listed as "LATEST SIMULATION EXAMPLES". These are eye-popping "Must Sees".
Who would not want to have toys,... I mean models like that.
Thanks Scott, and Thanks to Michael for creating such cool stuff.
Well, here is the other end of the spectrum. Scott McEachron, The D.C. CADD Company - Dallas posted as a comment the link to a website that has some spectacular animations.
Who would not want to have toys,... I mean models like that.
Thanks Scott, and Thanks to Michael for creating such cool stuff.
Wednesday, October 26, 2005
Making Movies
It is simple to make animations within Civil 3D. I have done so with the following steps.
1. Create a 3D Polyline with various methods.
or
1. Corridors > Export > Corridor Feature Line as Polyline (Creates a 3D Polyline)
2. Edit the newly created 3D Polyline (this will be used as the path for the Camera. I tend to raise or lower it depending upon my intention)
3. General > Camera > Add Camera (attach it to end of Pline)
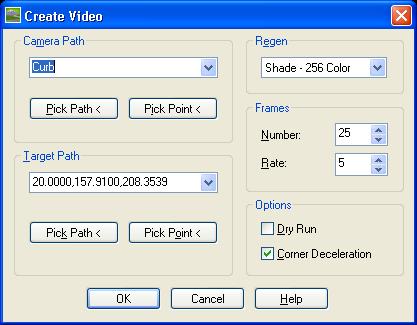
4. General > Camera > Create Video (Very simple to use. See image. Press "Help" button for specifics)(Select a Path & Target. Etc.)
5. Press OK button
6. Name and Select location for animation
7. Select Compressor (I like the TechSmith Screen Capture Codec if available)
8. It prompts if "...you wish to play the video now?"
That is all it takes.
Note: If you learned to make a movie from this post, I would be honored if you would share it with me. send to:
angelatketivtechdotcom (Re-formatted for spam reasons). Some may be to large to email.
Spielberg beware.
Monday, October 24, 2005
Improving Civil 3D Performance by Adsk
The following information is straight from the Autodesk Knowledge Base about Civil 3D 2006. It offers suggestions on how to improve performance with Civil 3D 2006.
1. Disable the Rebuild Automatic option for Surfaces and Corridors.
2. Change styles to limit the objects displayed in the drawing.
3. Use data shortcuts to reduce the amount of data in a working drawing.
4. Copy project files located on a network drive to a local drive.
5. Use the Cache model tab and the all layout tabs option on the System tab in the Options dialog box.
6. Increase Autosave timings on the Open and Save tab in the Options dialog box.
7. Change the value of the INDEXCTL variable to 0 (zero).
8. Turn off the Dynamic Input methods and selection previews.
The title of this post takes you right to the actual document.
DWG TrueView it is Free
Recently posted on the Autodesk website is DWG TrueView. This is the FREE DWG Viewer that many others had mentioned in blogs and discussion groups. It was finally released.
It is a stripped down version of AutoCAD. It gives users the ability to open .DWG and .DXF files. Additionally, users can Zoom & Pan, switch between layouts and model space, turn Layers or Views on/off, Plot files, and Publish to DWF.
Owners of Composer had a similar viewer under a different name.
DWG TrueView is avialable for free download from the Autodesk website. Click on the title of this post to get there.
Sunday, October 23, 2005
C3 Visits Autodesk
C3 the Civil CADD Consortium spent a few days up in San Rafael with Autodesk. This was time very well spent and demostrates the value of the Consortium.
C3 allows member companies to collaborate on solutions to challenges and brings a larger voice when addressing needs and desires with Autodesk.
I believe all attendees valued this visit. I know I did.
Note: I sat next to Dave Simeone at dinner Thursday evening. It was nice getting to know him better. Thanks Dave.
Friday, October 14, 2005
Map 3D Mini Demonstrations
Not all Civil 3D users know that it is built on top of Map 3D which itself is built on top of AutoCAD. This means that the capabilities of Map 3D are available to Civil 3D users.
For those users that do not know much about Map 3D the title of this post is linked to an Autodesk webpage that contains ten 1-3 minute mini demonstrations showing some of the Map 3D capabilities. Two that are of particular interest are:
Drawing Cleanup
3D Surfaces
Drawing Cleanup because it can greatly increase the users ability to fix drawings with errors, and 3D surfaces because Map 3D surfaces are the same as Civil 3D surfaces.
If nothing else a user should know about the bells and whistles even if they will never use them. Although, with some progressive thinking and a little bit of initiative users may see the usefulness for a whistle here or a bell there.
Thursday, October 13, 2005
Lost and Found: Panorama Window and it's Vistas
It is interesting how things occur in clumps. Coincidence? Conspiracy? Anyways, It was curious a few days ago when several users posted to discussion groups about the following issue and I received a phone call and an e-mail about the same thing.
Scenario: A user attempts to edit an alignment via the align grid view or edit a point. Both of these actions should open the "Panorama" window. The user should then see different tabs (Vistas) for the editor that they requested. Instead nothing appears to happen and the user is unable to proceed as intended.
Solution: The Panorama window was unintentionally docked. To undock it and make it visible the user should...

Unmaximize the drawing window. The "Panorama" window will be visible. Undock "Panorama" Window. Maximize drawing window.

Perhaps it was just a coincidence.
Scenario: A user attempts to edit an alignment via the align grid view or edit a point. Both of these actions should open the "Panorama" window. The user should then see different tabs (Vistas) for the editor that they requested. Instead nothing appears to happen and the user is unable to proceed as intended.
Solution: The Panorama window was unintentionally docked. To undock it and make it visible the user should...

Unmaximize the drawing window. The "Panorama" window will be visible. Undock "Panorama" Window. Maximize drawing window.
Perhaps it was just a coincidence.
Friday, October 07, 2005
Autodesk University 2005 Reminder

It is now less than 2 months until AU-2K5. I am told that it is becoming the largest one ever! Can you imaging around 4000 attendees in around 400 classes.
The title of this post links you to the registration page. Check it out. You can see the classes and instructors.
By the way, the class I am instructing is CV22-2 on Tuesday Nov. 29th from 5:00 pm - 6:30pm. It is titled "Autodesk® Civil 3D® Corridors: Cul-de-Sacs Are Not a Dead End". If you are attending please say hello.

Thursday, October 06, 2005
Earthwork Quantities
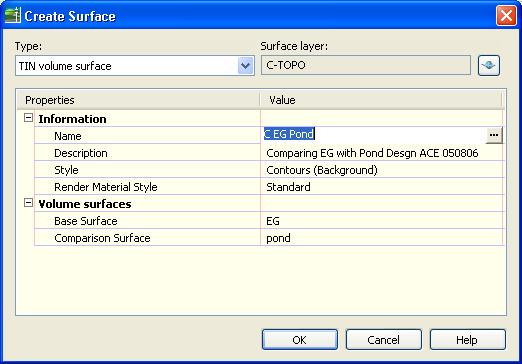
There are two primary ways to get Earthwork Volumes between two surfaces. One method involves the creation of a third surface the other just gives you the values of Cut and Fill.
The first image shows the "Create Surface" dialog box. Here we can either create a "Tin Volume Surface" or a "Grid Volume Surface". Either will prompt us for a "Base Surface" and "Comparison Surface". Once created we select the properties of the "Volume Surface". On the "Statistics" tab we can see the Cut and Fill Values (unadjusted)(see image below).

The other method I posted about on Dec 15, 2004. This is a repeat of what I said...
When it comes to doing earthwork volume calculations Autodesk Civil 3D 2005 (now 2006 of course) makes the entire process very streamlined.
The process boils down to initiating the "ReportSurfaceVolume" command, from one of the various methods, then telling the software I wish to do a new calculation. Lastly, I select the two surfaces that I wish to compare. The Panarama window instantly provides the results. These results include the "Cut", "Fill", and "Net".
The software uses the composite method for the calculations. Civil 3D Help explains this method as "...using the points from both surfaces, as well as any location where the triangle edges between the two surfaces cross. The new composite surface elevations are calculated based on the difference between the elevations of the two surfaces."
Monday, October 03, 2005
Tooltip Accuracy

Most Civil 3D users have encountered the tooltips. You just hover over or near a Civil 3D object and you get information related to the object(s) such as elevation, Station, Offset, at the location of the crosshairs. Some users have occasionally asked how do I get this information at an exact location?
This is one option:
Type SNAPBASE.
Use an OSNAP to select the desired location.
Now, make sure SNAP is now on and Hover at desired location.
When done set SNAPBASE back to 0,0
Note: Setting snap to 10 or higher will guarantee you remain at the desired location without wandering.
I will post about managing tooltips at another time.
Friday, September 30, 2005
Service Pack 2 Is Here
Today, Autodesk posted Service Pack 2. It Includes Autocad 2006 SP1, Map 2006 SP1, as well as Civil 3D 2006 SP1. The service pack resolves issues in many segments of the product ie. Points, Alignments, etc.
The title of this post is linked to the Service Pack 2 download Page.
Note: You must also install Land Desktop 2006 Service Pack 1 in order to use the migration capability in Civil 3D 2006 or if these two products are both installed on the same machine.
The title of this post is linked to the Service Pack 2 download Page.
Note: You must also install Land Desktop 2006 Service Pack 1 in order to use the migration capability in Civil 3D 2006 or if these two products are both installed on the same machine.
Wednesday, September 28, 2005
Documentation Input
I occasionally hear users make comments about the quality of the help system in applications. Well, here is your chance to make those comments directly to Autodesk. The title links to a 17 question user survey on Documentaion.
Autodesk is asking for your experience with...
Civil 3D (3 Questions)
Getting Started Guide (4 Questions)
Online Help (7 Questions)
Tutorials (3 Questions)
Autodesk is asking for your experience with...
Civil 3D (3 Questions)
Getting Started Guide (4 Questions)
Online Help (7 Questions)
Tutorials (3 Questions)
Tuesday, September 27, 2005
Mini Demonstrations
For anyone interested in introductory demonstrations of Civil 3D the title of this post is linked to the "Demonstration" page at the Autodesk website. There you will find links to eight short (2-3 Minutes) demonstation on the following subjects.
User Interface
Surfaces
Styles
Points
Data Shortcuts
Alignments
Profiles
Corridor Model
Useful in showing the capabilities of these features, a viewer can also follow the steps and learn a little bit of the Language of Civil 3D.
User Interface
Surfaces
Styles
Points
Data Shortcuts
Alignments
Profiles
Corridor Model
Useful in showing the capabilities of these features, a viewer can also follow the steps and learn a little bit of the Language of Civil 3D.
Monday, September 26, 2005
SAVE It
This is simple. Lets see if you are familiar with it. Most are not.
I often ask users what is the easiest way, straight out of the box, to access the "SAVE" command. Many will reply the "Diskette" icon on the "Standard" ("Civil 3D Standard" in Civil 3D) toolbar, Its tooltip says "Save CTRL+S". This is not the correct answer. They are referring to the Qsave command, verifiable by hovering over the button and reading the button description in the bottom left hand corner of the screen.
Typically the next answers are the "Save" or "Save As..." commands found on the "File" Pulldown menu. No, these refer to the QSAVE command, once again, and the SAVEAS command respectively.
The only way to initiate the SAVE command is to type it. Why is the SAVE command important? Because it can save you time. I have watched users do a SAVEAS command and type in a new file name. The problem is the they are now in that file with the new name. They then "CLOSE" that file and "OPEN" the original file that they were in.
With the "SAVE" command you can type a new file name, create that file, but you will remain in the original file.
By the way both the "SAVEAS" and "SAVE" commands bring up the "Save Drawing As" dialog box. The only difference is the results.
So, did you know it?
Google Video + Autodesk = FIRST
Google now does video. The Link above is for the Google Video search results page for the word "AUTODESK". I am posting this because the "first" several results are about FIRST (For Inspiration and Recognition of Science and Technology).
FIRST 's main purpose is to inspire an appreciation of science and technology in young people. Founded by Dean Kamen (the inventor of the Segway - Human Transporter) FIRST 's goals is "...to create a world where science, and technology are celebrated...where young people dream of becoming science and technology heroes..."
I have had the honor of hearing Mr. Kamen give a keynote speech and when it comes to providing direction and alternatives to young people this group has done so.
I have often been inspired by the accomplishments of this group and had to mention them.
I have had the honor of hearing Mr. Kamen give a keynote speech and when it comes to providing direction and alternatives to young people this group has done so.
I have often been inspired by the accomplishments of this group and had to mention them.
Friday, September 23, 2005
Style Management
Land Desktop users are finding that the procedures that they are accustomed to following are significantly reduced with Autodesk Civil 3D 2006. Creating & designing is accomplished more easily with Civil 3D.
For many their "New" challenge is managing the styles that they need to create and use. Because Civil 3D object styles reside in a drawing (similar to Page Setups) we should have a plan as to how to insure we have appropriate styles available when we need them. Although there are many styles that come "in the box" these should be considered a good starting point for your custom styles. We know we will have to make styles to use in the future, we also know that we will have to continue to create new styles and tweak the old ones.
Here is my plan.
I have a template (.DWT) file that contains the styles that I have created up until now. I have also saved this file as a drawing (.DWG) with the same name.
For New Drawings: I simply use the template to create my new drawing. Nothing surprising there.
For Existing Drawings that do not contain my needed styles: I insert the template file that I saved as a drawing (.DWG). When it asks me for the insertion point I cancel the command. This will introduce my styles into that file.
For Existing Drawings that do not contain my needed styles (Alternative): I create a new drawing from my template and insert the entire drawing (without the styles) into the newly created one and then save to the old name.
So far so good. But here is when things start to get a little tricky.
For styles that I create while in working files: I immediately open my template file and drag-and-drop the new style(s) from the toolspace "Settings" tab straight in to my template and save it. I also immediately save my template file as the drawing (.DWG) mentioned above. I will post about the "SAVE" command at another time.
Other methods of course are possible. Input anyone? The important part is to have a PLAN of some sort to manage the styles. With 83 objects that can have styles, we need a PLAN in order to be efficient.
I certainly appreciate the fact that larger organization will have a structure in place to handle "Object Styles". Not every user can, nor should be making styles unregulated. For those organizations that have a good library of style in place this can be a tremendous advantage for them. Imagine designing something and it be as it will appear in the final drawing.
Tuesday, September 20, 2005
LandXML Accuracy
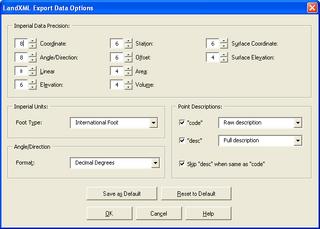
I had recently received a LandXML file created in Land Desktop 2006 that was curious in that all of the values were rounded to whole numbers. After a little investigation we found that the creator of the LandXML file unknowingly had the Precision set to zero (0) decimal places for all values when exporting to LandXML.
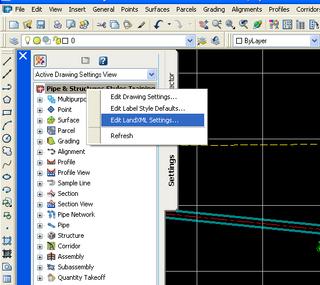
Prior to exporting to set or review the settings for LandXML in Civil 3D 2006 we should in the "Toolspace" palette, on the "Settings" tab, right-click on the drawing name and select "Edit LandXML Settings..." (See Image).
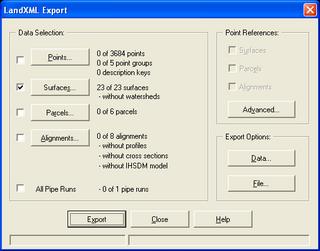
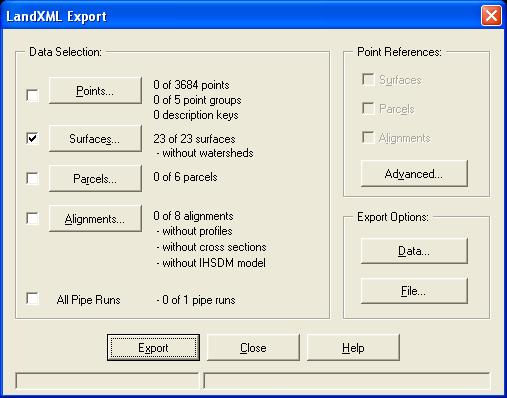
To do similar in Land Desktop 2006 from the "Projects" menu pulldown select the "Export to LandXML..." command. In the "LandXML Export" dialog box we press the "Data..." button under "Export Options:"
You will see the following dialog box.
If there is one thing that I have learned in this business, that is to "Always Double Check!"
Prior to exporting to set or review the settings for LandXML in Civil 3D 2006 we should in the "Toolspace" palette, on the "Settings" tab, right-click on the drawing name and select "Edit LandXML Settings..." (See Image).

To do similar in Land Desktop 2006 from the "Projects" menu pulldown select the "Export to LandXML..." command. In the "LandXML Export" dialog box we press the "Data..." button under "Export Options:"
You will see the following dialog box.
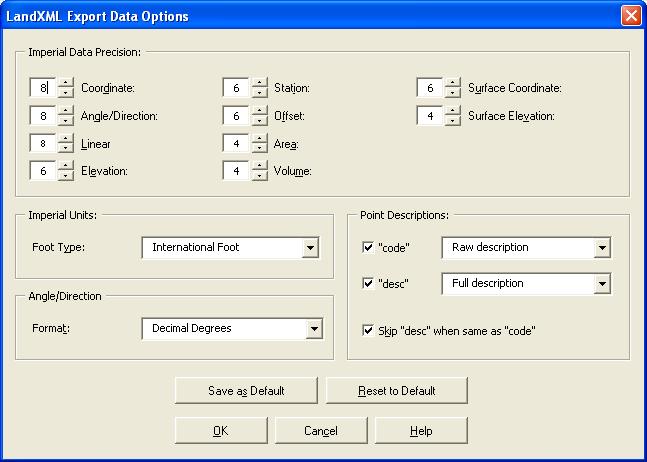
If there is one thing that I have learned in this business, that is to "Always Double Check!"
Service Pack 2 is Coming

I had almost forgotten that Service Pack 2 for Autodesk® Civil 3D® 2006 will be released very soon. I recall hearing near the end of September.
The link above gets you to the Autodesk webpage for Updates and Sevice Packs. This is where you will find the Service Pack when it is released.
Friday, September 16, 2005
Name the Parts

When creating Assemblies it is a good habit to get into to name the Subassemblies components. This will eliminate confusion when it is time to "Set Logical Names".
To name a Subassembly you can...
1. Select (highlight) the Subassembly component within an Assembly and modify the "Name" field in the Properties Palette.
or you can...
2. Select the Assembly (the centerline) Right-click and select "Assembly Properties" from the Short-cut menu. In the "Assembly Properties" dialog box select the "Construction" tab. In the Item window Right-click on an item, select "Rename" and give the item a more definitive name (see image). Repeat for every item.
Trust me when I say this will help you a great deal later.
Thursday, September 15, 2005
Zoom to or Pan to

Here is a quick tip. When working with users of Civil 3D 2006 they often forget to "Zoom to" or "Pan to".
What do I mean? On the Prospector tab of the Toolspace Pallette we can see the different objects contained within the current drawing. We can see the Parcels, Alignment, Surfaces etc. If we right-click on any of the objects, a Short-cut menu will appear and we can choose "Zoom to" which will zoom extents on the chosen object. Or, we can "Pan to" which will pan, at the current zoom magnification, to the centroid of the selected object. Which may not show us the object at high magnifications, especially with alignments.
Friday, September 09, 2005
Free DVD!
 I just received the Infrastructure Solutions Webcasts DVD in the mail. It contains, by my count, 65 recorded webcasts. Autodesk says that in contains 70, I guess I am missing 5 :^) .
The breakdown of the sessions are:
32 Civil 3D
17 Map 3D
13 MapGuide
3 Raster Design
The DVD contains the majority of the recorded session from the first one in January of 2004 until February 28th of 2005. Dave Simeone mentioned in today's webcast that there is a second DVD planned with the remain sessions which would be 24 and counting.
I can not think of a more cost effective way to get so much information about Civil 3D.
Order yours TODAY!! OPERATORS ARE STANDING BY!!
Oh, I guess I got a little carried away.
What Happened to Comments?
Unfortunately, there have been individuals that have used the comments capability of this Blog to post SPAM. This is a sad reality that affects many.
That is why I have chosen to temporarily prevent the ability to add comments until further notice.
:^(
That is why I have chosen to temporarily prevent the ability to add comments until further notice.
:^(
Thursday, September 08, 2005
Importing Points Part I
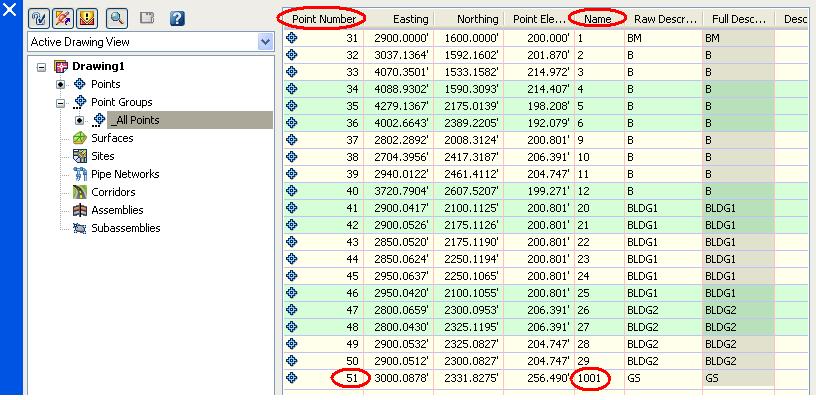
We know that there are several ways to import point data into Autodesk® Civil 3D® 2006. We can...
1. Import Points from an ascii file.
2. Use LandXML to transfer the points.
3. Use the
Not everyone knows that methods 1 and 3 will give us better results.
Why? Well unfortunately the LandXML format stores the point's number as
< CgPoint name="PointNumber"... >.
When the LandXML point data is imported into Civil 3D it is read as the Point Name NOT the Point Number. It will be handled as not having a number and will be automatically sequentially numbered.
Note: It is not possible to Use the "Import Data from Land Desktop..." (IMPORTLDTDATA) command to import the point data directly. This only supports the importation of Description Keys, Surfaces, Alignments, and Parcels.
Friday, September 02, 2005
Imageframe
This week we had a client contact us that requested ways to automate the turning ON and OFF of the IMAGEFRAME setting within his drawings. We shared with him something that can be easily overlooked. IMAGEFRAME now has a NEW value available. It has always been able to be set to...
0 Image frames are not displayed and not plotted.
1 Image frames are both displayed and plotted.
But, it can now be set to...
2 Image frames are displayed but not plotted.
With this new value we should not ever have to change it again.
By a timely coincedence Lynn Allen wrote about this in herBlog on Wedneday August 31st.
0 Image frames are not displayed and not plotted.
1 Image frames are both displayed and plotted.
But, it can now be set to...
2 Image frames are displayed but not plotted.
With this new value we should not ever have to change it again.
By a timely coincedence Lynn Allen wrote about this in her
Friday, August 26, 2005
Civil 3D White Papers
Dave Simeone had recently mentioned that there are NEW white papers regarding Civil 3D®. The link above gets you to the Civil 3D® White Papers page where you can download the following: (Some were written for Civil 3D 2005®. But, they still apply)
Using Civil 3D in a Multiuser Environment
Autodesk Civil 3D Styles: A Guide to the Fundamentals
Autodesk Civil 3D Return on Investment
Comparing Autodesk Civil 3D 2005 and Bentley GEOPAK
Comparing Autodesk Civil 3D 2005 and Bentley MX Software
Autodesk Civil 3D 2005 versus AutoCAD 2005
Autodesk Civil 3D 2005 Versus Autodesk Land Desktop 2005
True Model-Based Design with Autodesk Civil 3D
Using Autodesk Civil 3D with Autodesk Land Desktop 2005
Using the Autodesk Civil 3D Dynamic, Relationship-Based Environment
Thursday, August 25, 2005
Milestones!
My previous post was my 100th post to this blog. Tommorrow the 20,000th visit in 2005 should occur. Yet most amazing to me, there have been visitors from 123 different countries.
If you have questions, suggestions or comments please contact me.
If you have questions, suggestions or comments please contact me.
AutoCAD 2006 Service Pack 1
Service Pack 1 was released yesterday for the following products:
AutoCAD® 2006
AutoCAD LT® 2006
Autodesk® AutoCAD® Revit® Series 8.x / Autodesk® Revit® Building 8.x
If you have been experiencing unexplained behavior this may help.
AutoCAD® 2006
AutoCAD LT® 2006
Autodesk® AutoCAD® Revit® Series 8.x / Autodesk® Revit® Building 8.x
If you have been experiencing unexplained behavior this may help.
Friday, August 19, 2005
NEW Civil 3D Blog
I am very glad to say that there is another Blog that focuses on Civil 3D. Scott McEachron of D.C. Cadd Company (Dallas, Texas) has started...
"Civil 3D - Paving The Way, an Autodesk Civil 3D Resource"
Knowing Scott, he will provide us all with lots of very useful information.
P.S. Happy Birthday Scott! Welcome to the Club.
"Civil 3D - Paving The Way, an Autodesk Civil 3D Resource"
Knowing Scott, he will provide us all with lots of very useful information.
P.S. Happy Birthday Scott! Welcome to the Club.
Thursday, August 18, 2005
AUGI Cad Camp Follow Up & Earthwork Calcs
AUGI held their Orange County Cad Camp, Tuesday, just around the corner at California State University Fullerton. It was a huge success. The Civil 3D Corridors class had over 50 students.
We held an Earthwork Volume Calculations class. Of the one hour and fifteen minutes of class, one hour and five minutes were used to describe the entire process in Land Desktop. I then demonstrated how to calculate the values in Civil 3D. I first imported the surfaces from Land desktop. I then did the calculation. This took about three minutes including the narration. I know this shocked some students by how easy and fast the process was.
We held an Earthwork Volume Calculations class. Of the one hour and fifteen minutes of class, one hour and five minutes were used to describe the entire process in Land Desktop. I then demonstrated how to calculate the values in Civil 3D. I first imported the surfaces from Land desktop. I then did the calculation. This took about three minutes including the narration. I know this shocked some students by how easy and fast the process was.
Thursday, August 11, 2005
Isolate Object(s)
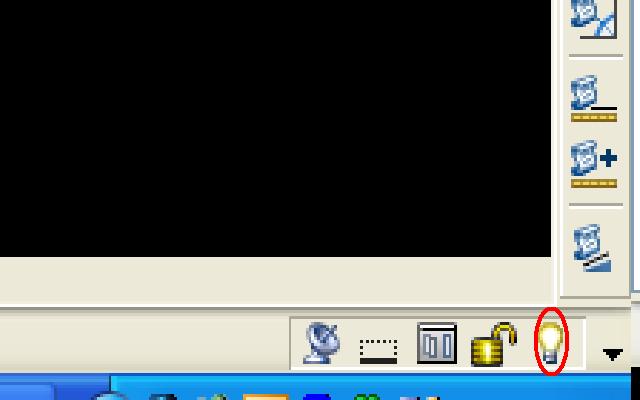
Have you ever noticed a small "YELLOW" light bulb in the lower right hand corner of your application? If you select it you will be given the choice in a shortcut menu to:
Isolate Objects
Hide Objects
If you select one of these choices you will then be prompted to "Select Objects". When you are through selecting objects and press the Enter Key the objects you selected are either isolated (everything else is not displayed) or hidden (the objects you selected are not displayed).
This happens irrespective of the layering schemes. This means many objects that share a single layer can be turned on and off individually.
The light bulb is "RED" when the user has any objects isolated or hidden. The process can be continued as desired. To end this situation pick the now "RED" light bulb and select "End Object Isolation" from the shortcut menu.
This funtionality is typically intended to be used for short term visual clarity. The Isolation & Hiding of objects is retained from session to session if the user forgets to "End Object Isolation"
Tuesday, August 02, 2005
Autodesk University 2005 Registration Alert!

It is that time again. It is time to register for the Autodesk University Annual User Conference and Exhibition. This year’s event will be held in Orlando, Florida. This is a premier Autodesk learning and networking event that is not to be missed!
For those of you who are interested in Autodesk® Civil 3D® classes, a quick count of the available course sessions showed of the 39 "Civil Track" sessions 35 of them are either Civil 3D® or Civil 3D® and Land Desktop® related. Covered subjects will include Basics/Fundamentals, Projects, Styles, Points, Parcels, Grading, Profiles, Corridors and Pipes. The classes range from Introductory classes to Intermediate and Advanced sessions.
By the way, I will be conduting a class for Civil 3D®:
CV22-2 Autodesk® Civil 3D® Corridors: “Cul-de-Sacs Are Not a Dead End”
Hope to see you there.
Tuesday, July 26, 2005
AUGI Cad Camp Update

It turns out that I will be conducting courses at the AUGI Cad Camp to be held here in Orange County, California on Tuesday August 16, 2005. The Cad Camp will be held in the Titan Student Union on the California State University, Fullerton campus.
I will be the instructor for "Civil 3D Corridors - All Roads Lead to Intersections" S2-3. I will also be co-presenting with John Rodriguez in LDt 2006 "Calculate Earthwork Volumes - It's Not a Dirty Job" S4-3.
Click the title of this post to visit the AUGI Cad Camp website.
Monday, July 25, 2005
Degree Symbol
Someone was recently inquiring about the display of the degree symbol. Most people are aware that entering %%d will display it within text fonts that support it. In this particular case, because the user was attempting to show a degree symbol within "Curve Text" %%d would not do.
Here is another way to show the degree symbol. This is from the Autodesk knowledge base.
1. With Numeric Lock enabled on the numeric keypad, press and hold the ALT key and then press 0,1,7, and 6 on the numeric keypad.
2. Release the ALT key.
Note: The numeric keypad is necessary.
Here is another way to show the degree symbol. This is from the Autodesk knowledge base.
1. With Numeric Lock enabled on the numeric keypad, press and hold the ALT key and then press 0,1,7, and 6 on the numeric keypad.
2. Release the ALT key.
Note: The numeric keypad is necessary.
Thursday, July 21, 2005
Updated Civil 3D Help Documentation

Autodesk has made available updated Help documentation for Pipe Networks and Subassemblies. These files include a series of minor corrections and minor enhancements to the documentation.
The Pipe Network section has new information on how to edit pipe family sizes.
The Subassemblies portion now also updates the .PDF found in Help that describes the stock subassemblies. If you are curious it is 306 pages long. It is also very useful.
Thursday, July 14, 2005
LDt Point Conversion Utility
Autodesk released today a utility that will allow a user to convert Land Desktop "Point Objects" that exist in a drawing opened by Civil 3D, into Civil 3D "Point Objects".
Once the utility is loaded a user initiates it with the ConvertLDTPoints Command.
In order to properly install the utility a user should have Civil 3D 2006 with SP1 installed, and either Land Destop 2006 or the Land Desktop 2006 Object Enabler.
Once the utility is loaded a user initiates it with the ConvertLDTPoints Command.
In order to properly install the utility a user should have Civil 3D 2006 with SP1 installed, and either Land Destop 2006 or the Land Desktop 2006 Object Enabler.
Monday, July 11, 2005
Back to Basics - Part I (Objects)
Civil 3D 2006 creates 26 OBJECTS. They are the following:
Alignment
Alignment Table
Assembly
Corridor
Corridor Section
Feature Line
Grading
Grid Surface
Parcel
Parcel Segment
Parcel Table
Pipe
Pipe Network Section
Pipe and/or Structure Profile
Point Group
Point Table
Profile
Profile View
Sample Line
Section
Section View
Sheet
Structure
Subassembly
Surface Legend Table
Tin Surface
Friday, July 01, 2005
Clarification Thank You!
I would like to thank Himanshu Gohel, Civil3D Software Developer, for a clarification he provided. Yesterday, I mentioned that the Service Pack Readme file contained information about Osnap behavior with Profile Objects & Views (I referred to it as new behavior). Per Himanshu's clarification the information is a Documentation Supplement (missing information from Help). The behavior already existed but was not documented. Thanks again!
Thursday, June 30, 2005
Service Pack 1 Now Available
Service Pack 1 is now available for download. Based on the Readme it seems that everyone will want to install it soon.
One interesting item to note in the Readme file is that now osnaps will either have or not have the ability to react with Dynamic Profiles, Static Profiles or Profile Views depending upon the osnap. An example is the "Quadrant" Osnap, which cannot react with any of the above mentioned items. This theoretically should enhance profile creation a touch.
One interesting item to note in the Readme file is that now osnaps will either have or not have the ability to react with Dynamic Profiles, Static Profiles or Profile Views depending upon the osnap. An example is the "Quadrant" Osnap, which cannot react with any of the above mentioned items. This theoretically should enhance profile creation a touch.
Wednesday, June 29, 2005
Google Earth
I would commonly show Nasa World Wind to Civil Engineers and most would get excited about being able to have such a tool available to them for free.
Well as of yesterday, Google Earth took the concept of a 3D globe with images draped on to terrain to another level.
AECNew.com has an article that describes Google Earth and the potential ramifications to the AEC communities.
I am very impressed with Google Earth and am looking forward to finding out more of it's potential usages.
Well as of yesterday, Google Earth took the concept of a 3D globe with images draped on to terrain to another level.
I am very impressed with Google Earth and am looking forward to finding out more of it's potential usages.
Monday, June 27, 2005
Updates & Service Packs
Last Friday I mentioned that Service Pack 1 would be out very soon. That got me thinking about the current updates that are available for Civil 3D 2006. There are three available.
The first to come out was Hotfix 1 released on May 10, 2005. This Hot Fix is for the English-language versions of Autodesk Civil 3D 2006 running on non-English-language operating systems.
The second, known as a Security Update, released June 8, 2005 is intended for every 2005 & 2006 Autodesk product. It prevents a local user from inappropriate access to another local user's computer.
The third was released last Wednesday (June 22, 2005). It corrects two problems with Customize User Interface (CUI) editing.
You should advise whomever is responsible within your organizations for these matters. The link above gets you to the Civl 3D "Updates and Service Packs" page.
Friday, June 24, 2005
Important Webcast Info
If you happened to miss today's Civil 3d webcast there were a couple of interesting bits of news.
1. Service Pack 1 will be released from Autodesk engineering on June 30th. The official statement was that it would be a 4.3 MB download that touches all features of the program. As expected, the Readme file that was shown seemed to be heavy on Grading fixes.
2. A new LDt Point Object Conversion Utility was announced. To be release in Mid-July this utility will allow users to convert LDt drawing Point Objects to Civil 3D Point Objects.
Wednesday, June 22, 2005
Part Swapping vs Part Sizing
A user had recently asked me how to modify an existing pipe in order to make it's diameter larger. As with most modifications there are several potential methods to accomplish the desired results.
Two terms did come to mind as potential processes to use.
The first was Part Swapping. This allows the user to swap a pipe with another type of pipe and/or size as needed. To do so you...
1. Select the pipe to be edited.
2. Right-Click
3. Pick "Swap Part..."
4. Choose new part and/or size from "Swap Part Size" Dialog Box and Press OK button.
The second term is Part Sizing. To accomplish this you must...
1. Select the pipe to be edited.
2. Grab the triangular grip near the midpoint of pipe.
3. Drag grip, or type new diameter and press enter, to size the pipe.
Monday, June 20, 2005
Autodesk University 2005
Well, as of now, it looks as though I will be giving a Civil 3D 2006 class at Autodesk University this November/December. The class will be about Cul-de-Sacs and Knuckles.
I am currenly submitting to give a couple of Civil 3D 2006 classes at a future AUGI Cad Camp. I'll keep you posted.
We here at KETIV Technologies have seen the requests for training on Civil 3D really begin to take off. AU and Cad Camp are a couple of ways to reach more users.
I am currenly submitting to give a couple of Civil 3D 2006 classes at a future AUGI Cad Camp. I'll keep you posted.
We here at KETIV Technologies have seen the requests for training on Civil 3D really begin to take off. AU and Cad Camp are a couple of ways to reach more users.
Thursday, June 16, 2005
C3 - Civil CADD Consortium
There is a group of Southern California civil engineering companies that have organized in order to better serve their own co-workers/users and ultimately their clients. This group is the "Civil CADD Consortium". The slogan is "Promoting Civil Engineering Excellence Through Collaboration".
The main idea is that Local Office and Corporate Level CADD MANAGERS from different companies, large and small, meet and share their experiences and challenges with one another. The collaborative nature of this group is very genuine and profound.
Needless to say this group has gained Autodesk's ear. This is the "AUGI" for the Civil Engineering community of Southern California.
If there are similar organizations in your area I encourage you to look into them. Aside from the obvious business networking benefits. The ability to develop friendships with people in similar roles is both gratifying and worthwhile.
I mention this group for two reasons...
1. Today on the agenda is an in-depth review/analysis of Civil 3D 2006
2. More importantly, I have the good fortune of being a member of this group. I wish to thank each and every one of them for their contributions to the group.
Wednesday, June 08, 2005
AUGI Cad Camp
Autodesk User Group International (AUGI) will be holding a regional CAD Camp here in Southern California on Tuesday, August 16, 2005. This can be a very good opportunity for Autodesk Product users who can not attend Autodesk University, because it takes them away from the office for several days, to attend a one day worthwhile event.
Attendees can can participate in up to 5 class sessions for various industries, products, and levels of instruction.
Click on the link above to see the CAD Camp Official Website. There may be a Camp in your area.
I'll see you there.
Attendees can can participate in up to 5 class sessions for various industries, products, and levels of instruction.
Click on the link above to see the CAD Camp Official Website. There may be a Camp in your area.
I'll see you there.
Friday, June 03, 2005
Autodesk's Realize Your Ideas Tour
Yesterday, we here at KETIV Technologies along with hundreds of others attended the sixth stop of the fifteen stop tour at the Doubletree Hotel in Anaheim California. It was good to see so many Autodesk product users sharing thoughts and experiences with Autodesk and each other.
Lynn Allen was her usual entertaining self. Guy Kawasaki, who was the keynote speaker, was both insightful and humorous. The time spent attending sessions and networking was well spent.
If you have the opportunity to attend any of the remaining stop on the tour I encourage you to do so. Click on the title of this post to register.
Tuesday, May 31, 2005
INSUNITS Changed!
John Rodriguez, a new co-worker of mine, pointed out that it is now VERY necessary to notice what the INSUNITS value is set to for any drawing that you wish to INSERT or XREF. This only mattered in previous version if you dragged-and-dropped via the DesignCenter.
If INSUNITS does not match what the current (destination) drawing is set to, a scale factor will be applied. This has left some users baffled as to why their drawings with the same base and coordinate location do not land in the same area when inserted or xref'ed.
The INSBASE value and the factor that will be applied now appear in the INSERT and XREF dialog boxes in the lower right hand corner. Be aware of what they report.
The change can be explained with a quick look into how INSUNITS is defined in HELP.
In 2005 it said:
INSUNITS - Specifies a drawing-units value for automatic scaling of blocks or images dragged from DesignCenter and inserted into a drawing.
In 2006 it says:
INSUNITS - Specifies a drawing-units value for automatic scaling of blocks, images, or xrefs inserted or attached to a drawing.
Tuesday, May 24, 2005
Fixed, Floating or Free?
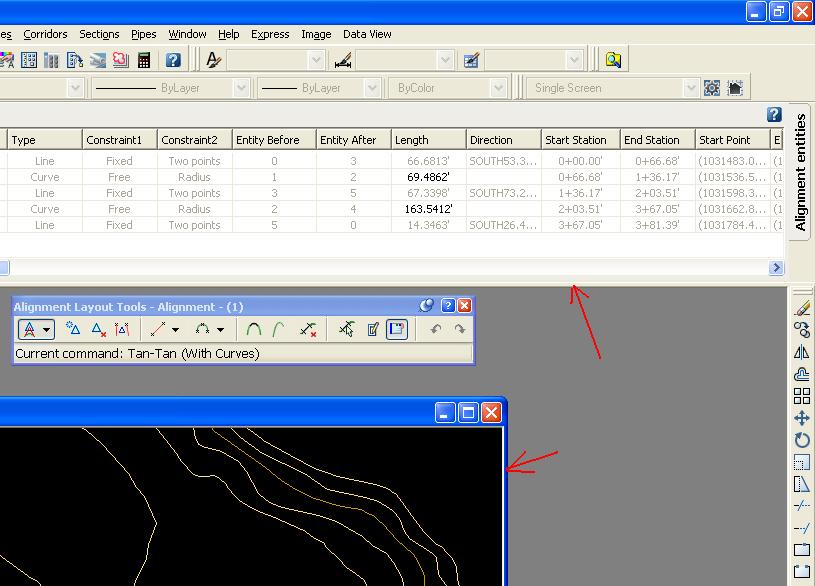
I have always had a little bit of difficulty remembering quickly what the terms Fixed, Floating, and Free mean as they apply to alignments. Here is a quick tip.
Fixed - I pick both end points. It is fixed by me.
Floating - Object floats from one object (it is tangent). I specify other endpoint.
Free - Object is tangent to two objects. I did not specify any endpoints.
Fixed - I pick both end points. It is fixed by me.
Floating - Object floats from one object (it is tangent). I specify other endpoint.
Free - Object is tangent to two objects. I did not specify any endpoints.
Monday, May 23, 2005
A Couple of Interesting Facts
Two bloggers pointed out a couple of things that I found interesting.
Lynn Allen mentioned the undocumented FILTERS command. This command brings up a dialog box (with no help button) that allows you to pick which layer filters you wish to keep or delete.
Ralph Grabowski pointed out that if an onject is on a locked layer will display the icon of a lock when you attempt to select it.
Ralph also mentioned that if you hold the shift key while doing a fillet or chamfer the software will do a radius 0 corner. I like that very much.
Thursday, May 12, 2005
I've Been Away
Wow, what a week. I've been away providing a tremendous amount of training. It may be coincidental but it feels as though the new Civil 3D 2006 has put some, conscious or subconscious, pressure on the larger engineering companies to look at the way they are doing things and perhaps readjust.
Let me explain. Some of the larger engineering firms will not be easily able to convert over to Civil 3D. The smallest companies CAN do so easily, because it is a matter of training only a handful of users. Because the smaller companies are increasing their efficiency and productivity with Civil 3D and also because the larger firms can not hire enough qualified individuals the larger firms must be able to do more with their existing staffs.
This means they are turning to training to provide a solution. This is a good scenario for everyone involved.
Wednesday, May 04, 2005
Drawing Recovery Manager
I had recently been away from the office. Today, when I launched Civil 3D 2006 the "Drawing Recovery" dialog box appeared. It states...
In your previous work session, the program unexpectedly failed.
Information has been gathered from the drawing files that were open
at that time.
The Backup Files list displays the backup files that are available.
Double-click the files on the list to open and compare their contents.
Once you determine which file contains the best backup data, use
Save As to specify the correct folder location and rename the file.
There is a checkable box to.... "Don't show me this again" and lastly there is an OK button.
In the Drawing Recovery palette and files related to the file that requires recovery would be listed. These may include the .DWG file, the .BAK file, and the .SV$ file (the autosave file). The user can then see details of the file(s), and also a preview. As the message above indicates double-clinking on one will open it. Once the appropriate file is saved that file and it's related files are removed from the drawing recovery palette.
Clearly, this allows the recovering process to be done with greater confidence.
Oh, I almost forgot. You can open the Drawing Recovery palette at any time with the DRAWINGRECOVERY command.
Friday, April 22, 2005
Autodesk Official Training Courseware
I am definately looking forward to the Autodesk Official Training Courseware (AOTC) for Civil 3D 2006. I believe it will be an update version, which means it focuses on the differences between 2006 and 2005.
I was impressed with the Civil 3D 2005 AOTC. There were a few things left out but as far as showing how things are done with real world examples that I could relate to, I liked it.
I had previously read on Shaan Hurley's Blog that the new versions of AOTC will contain product trial CDs of the software, they will be standard 8-1/2 x 11 inches in size, and they will be spiral bound (they can lie flat). All welcome changes.
Blog Site Stats
We have now had over 10,000 visits to the site this year from 98 countries.
Thank you!
P.S. Please remember input is ALWAYS welcome.
Thank you!
P.S. Please remember input is ALWAYS welcome.
Wednesday, April 20, 2005
Civil 3D Demonstration
We held a seminar today focusing on the 2006 family of products, with a distinct focus on Civil 3D 2006. One of the moments that I felt was most impactful for the typical Land Desktop user was when we showed how very easy it was to transfer their Land Desktop project data into Civil 3D 2006 and then after working with that data getting that information back into Land Desktop. The ease with which this is accomplished was surprising to many.
I have in the past made reference to the Land XML capability to do this, and the fact that both Civil 3D and LDt can read data directly from the other. Certainly, Civil 3D offers many quicker easier ways of doing things. But, this groups saw that their existing data can be used instantly. Also they saw that they can learn portions of Civil 3D and use this to supplement their existing capabilities.
Most saw that it is not necessary to learn the ENTIRE package (Civil 3D) in order to improve efficiency and profitability.
Saturday, April 16, 2005
The Entire World in 3D
The link above gets us to a NASA website that allows us to download software which when installed gives us a 3D view of the entire planet.
This is the best viewer I have ever seen. You can change the base images between true color, black and white, false color, quad maps, and the images for urban areas are awesome.
Many of you have seen the urban area maps on Goggle Maps, TerraServer or other locations. But, when I saw them in 3D I was blown away!!!
We have the choice of many image formats to save the views to.
Friday, April 15, 2005
Day 4
Today was the final day with Autodesk. We covered the improvements to assemblies, corridors, and sections, among other things. Here are a couple of QUICK points:
We can now toggle different regions ON and OFF within a corridor (this should speed things along).
In sections we can now edit individual sections or ranges of sections. This was excellent!
We can now create labels that apply to sections automatically. This is a BIG time saver.
Imagine placing Corridor Feature lines in profiles. It is now possible.
With these things and many more we will have tons to learn and take advantage of in the coming months.
Thursday, April 14, 2005
Pipes - Second Glimpse
Today in Orlando we focused on the NEW Pipes capabilities. I came away with the feeling that it is simpler to use than most would think. The default styles, parts, and rules cover many user scenaries. Yet, there is still enough flexibilty and depth to allow for more intricate designing and drafting requirements.
I apologize for the bevity of this weeks posts. But, this is Orlando after all.
I hope to cover all of these subjects and more in detail in upcoming posts. I have one more day here and I must admit I am looking forward to it.
By the way, I had the opportunity to meet many of the folks that provide quality responses in discussion groups and other locations. It is great to have finally met them.
Wednesday, April 13, 2005
Map 3D 2006 & Raster Design 2006
Today in Orlando my time was spent looking at Map 3D 2006 and Raster Design 2006. Both of these products have some pretty good improvements. My favorite for each was:
Map 3D 2006: The ability to to automatically create links between objects with object data and database table records. This was VERY easy to use!
Raster Design 2006: The TOUCHUP command which is similar to paintbrush. This allows the user to freehand add of remove pixels from a bitonal raster image.
Tommorrow a closer look at Civil 3D 2006.
Tuesday, April 12, 2005
AutoCAD 2006
Today in Orlando, with Autodesk, the Infrastructure Solution Division's (ISD's) focus was AutoCAD 2006. The main focus of this release, without question, is making drafting faster and easier. This is accomplished by the five following capabilities:
1. Much Improved Heads-up Design
2. Anntotation Improvements
3. Productivity Enhancements
4. Improved Blocks
5. Migration/Transition
Perhaps the most impactful for users with more experience is the "Dynamic Imput." This is the ability to see most of the user's interactions at the input location instead of the command line which is where we are used to seeing them. This NEW ability allows us to work without the command line visible. Thereby gaining extra drawing real estate. To be honest I do not miss the command line.
Friday, April 08, 2005
Out of Town
I will be away from the office from April 11-15. I will be attending an Autodesk event. I am not certain if I will be able to provide updates during this time. We shall see.
When I return, I expect to be much more informed about Autodesk Civil 3D 2006, and it's core products Map 3D 2006, and AutoCAD 2006.
When I return, I expect to be much more informed about Autodesk Civil 3D 2006, and it's core products Map 3D 2006, and AutoCAD 2006.
Wednesday, April 06, 2005
Pipes - First Glimpses
I have had the opportunity to work with the new Pipes capabilities in Autodesk Civil 3D 2006, and I have been both pleased with what it can do, and surprised by it's ease of use.
The interface for creating pipes is very similar to how we create alignments and profiles already. This makes adopting the new capability very easy.
The concepts already learned for managing and using styles easily apply to pipes and structures.
More glipses to come.
The interface for creating pipes is very similar to how we create alignments and profiles already. This makes adopting the new capability very easy.
The concepts already learned for managing and using styles easily apply to pipes and structures.
More glipses to come.
Tuesday, April 05, 2005
Put It In Reverse
Someone had recently asked in the discussion groups if it was possible to reverse the direction of an alignment in Civil 3D. Dave Simeone, the Autodesk Civil 3D Product Manager, replied that in Civil 3D 2006 it will be possible.
From the Alignment menu, we choose "Reverse Alignment Direction." We are then prompted to...
Select an alignment {or press enter key to select from list}:
Once we select the alignment we will receive a warning message that states:
Warning! Reversing the alignment will remove all station equations, design speeds, superelevation data, and may adversely affect objects and data already created from the alignment.
After we press the OK button on the warning the alignment will be reversed.
Clearly, this works best very early in the design process. If we have profiles, sections, sample lines, corridors and superelevation data already generated from the alignment this can be problematic.
Friday, April 01, 2005
Data Shortcuts Revisted
During the Autodesk Civil 3D webcast today, Rob Todd explained the use of Data Shortcuts in detail. There are three components:
The Data Definition - This is the Object (Alignment, Surface, Profile) that will be made available for referencing into other drawings (convenient in the Civil 3D 2006 project environment).
The Data Shortcut - A link to the original object data definition. We can create a shortcut from the Prospector or by selecting an object and right-clicking. If we are working in the Civil 3D 2006 Project environment this link is "managed" automatically for the user.
The Data Reference - By selecting "Create Reference" from a shortcut we introduce a lightweight, non-editable (read-only) reference to the original object. We can still control the appearance with styles. We can also use the object to create related object such as create a profile from a referenced alignment and a referenced surface.
Rob also detailed the directory structure he uses to store a project.
Securing project data can be handled by locking layers on which important data reside and/or by limiting edit permissions to directories where original data is stored.
The important thing to note is that now many users can have access to this important data without the possibility of modifying the data inadvertently.
Tuesday, March 29, 2005
What are Workspaces?
The Autodesk 2006 family of products, including Civil 3D 2006, have a new way to manage how the program looks and how we change the appearance and location of things like toolbars.
Workspaces control MENUS, TOOLBARS, and DOCKABLE WINDOWS. They can more easily manage task-oriented configurations than the profiles that we may have used in previous versions to accomplish the same thing.
We can now configure the visibility and location of the toolbars for when we do a specific activity like Annotation/Dimensioning and then save a "Workspace". When we need to insert blocks we may configure the screen differently and then save another "Workspace".
The Workspace Pulldown on the Workspace Toolbar allows us to reconfigure the screen on the fly. This is more efficient than the "Profiles" method that we may have used before because we do not manage directories, settings, and other values with Workspaces.
Lastly, Workspaces are a part of the Customize User Interface (CUI) that I mentioned on the 17th of this month. It will be much easier to migrate and manage these from now on.
Friday, March 25, 2005
What Are Data Shortcut?
Autodesk Civil 3D 2006 is using a new procedure called a "Data Shortcut" to allow for the collaboration/sharing of Surfaces, Alignments, and Profiles.
Autodesk refers to a shortcut producer as the person who has a source object's drawing open, and then creates the shortcut. The shortcut consumer is the person who uses the shortcut to create a read-only lightweight reference to the source object. This process still allows the consumer to apply local object styles, annotation, limited analysis, and access to the objects properties.
The Autodesk Civil 3D webcast on Friday April 1 will be focused on this capability.
Tuesday, March 22, 2005
Styles Galore
I just did a tally of the styles in Autodesk Civil 3D 2006. I now counted a total of 83 styles. This is up from the 76 I counted in the 2005 version of the software.
The seven new styles are three Code Label Styles (Marker, Link, and Shape) and four that pertain to pipes and structures. They are Pipes Styles, Pipe Label Styles, Structure Styles and Structure Label Styles.
The first three new styles allow us to now control the display characteristics of Markers, Links, and Shapes in a Code Set. Then we can apply the Code Set to Subassemblies, Assemblies, Corridors, and Section Views.
The other four control the appearance of Pipes and their Labels, and Structures and their Labels.
Friday, March 18, 2005
Civil 3D Webcast
The attendance for the today's Autodesk Civil 3D Webcast was noticably higher than usual. At one point there was over 200 attendees. Clearly, there were many of us who were eager to see Autodesk introduce Civil 3D 2006.
As a quick recap for those who missed it there were three primary focuses of the demonstration portion of the webcast.
1. Multi-User Access to Data
2. Corridor Modeling Enhancements
3. Pipe Networks (NEW)
If you did miss the webcast check the link above periodically to see when today's webcast will be posted for viewing.
Based on the questions that can be submitted via Live Meeting. The response to the product was quite good. I likewise, was very pleased by what I saw.
Thursday, March 17, 2005
Migrating Customization to 2006
Autodesk is making it easier for many users to migrate their customized tools to a 2006 based version of their software.
Firstly, during installation there is an new automated tool that can read existing customized menus and toolbars and transfers them to the new 2006 installation.
Secondly, the Customization User Interface (CUI) is an XML based file that will keep track of the customized user interface elements. This is a single interface that manages all of the following:
Menus
Short Cut Menus
Toolbars
Workspaces (NEW ITEM)
Keyboard Shortcuts
Mouse Buttons
Lisp Files
adds tooltips
adds descriptive text on the stauts line.
There are both MAIN CUI files which are editable per user and ENTERPRISE CUI files, which will be read-only and typically controlled by a CAD Manager, that are available to all in a shared fashion.
Wednesday, March 16, 2005
Civil 3D 2006 Drawing Format
I have been asked several times '...has the dwg file format changed for 2006?"
No, all of Autodesk's 2006 based products maintain the 2004 file format. This means that there is no need to save to a previous version in order to open the drawing in 2004 or 2005 based products.
By the way, All custom routines and third party applications that worked on 2004 and 2005 will also work on 2006.
Friday, March 11, 2005
Official Introduction Webcast
Autodesk's official introdution for Civil 3D 2006 will be on the Civil 3D webcast of Friday March 18th, from 9 a.m. - 10 a.m. PST.
The title above links you to the site for log on and call in information.
I know I'll be there.
The title above links you to the site for log on and call in information.
I know I'll be there.
Thursday, March 10, 2005
NEW! Civil 3D 2006
In the coming days, and weeks, I along with many others will begin providing information about the soon to be released Autodesk Civil 3D 2006. This product incorporates all of the improvements of AutoCAD 2006, and Map 2006 (and there are many). Civil 3D 2006 also contains new features and enhancements of many existing features.
Today, I will briefly mention a few topics that I will expand upon in the near future.
Improvements were added to just about every section of the software such as, Points, Surfaces, Sites, Parcels, Alignments, Corridors, Profiles, Profile Views, LandXML Import/Export, and the API (specifics are forth coming).
Brand new features include Pipes and Structures, and Multi-Drawing Access to: Surfaces, Alignments, and Profiles (again, specifics will be forth coming)
I look forward to learning about Civil 3D 2006 and sharing the information with all that are interested.
Wednesday, March 09, 2005
Map Cleans Up
The Map Drawing Clean-up Tools have proven their value long ago. If you are not familiar with them, you should look into what they can do. Such as:
Delete Duplicates
Erase Short Objects
Break Crossing Objects
Extend Undershoots (lines that end short of a crossing object)
Apparent Intersection
Snap Clustered Nodes (snaps endpoints together)
Dissolve Pseudo-Node (similar to Pedit > Join)
Erase Dangling Objects (deletes objects that are connected at only one end)
Simplify Objects (2D weeding of polylines)
Zero-Length Objects
Weed Polylines (adding and removing vertices of 3D polylines)
The real strength in these tools is the ability to act upon selected objects or the entire drawing at once. It is possible to either mark what needs to be fixed or have the software automatically fix them.
Most of the above cleanup actions also use a built-in user definable tolerance value in order to additionally specify which objects to adjust and by how much.
These tools are well worth the investment to learn.
Tuesday, March 08, 2005
Undocumented Command
Nowhere in the Civil 3D Help system is there reference to the AECLINEWORKSHRINKWRAP command. This command is present in Land Desktop and is described in Land Desktop Help. You can use it in Civil 3D 2005.
To use it enter AECLINEWORKSHRINKWRAP at the command line. It then prompts you to "Select object(s) to generate shrinkwrap from:". Select object(s) and press Enter. A new Polyline will be created on the current layer from the silhouette/outline of the selected objects.
The command can also be entered after you have selected objects in Noun/Verb mode.
Monday, March 07, 2005
AutoCAD 2006 Sneak Peeks
For everyone interested in finding out about Autodesk's 2006 products now is a very interesting time. There has now been quite a bit written by people in the Beta programs that also Blog.
Autodesk has given them special permission to provide their impressions of AutoCAD 2006 on their Blogs.
If you click on Shann Hurley's or Lynn Allen's blogs in the links below and to the left you can start to find out what is being introduced and improved.
Autodesk has given them special permission to provide their impressions of AutoCAD 2006 on their Blogs.
If you click on Shann Hurley's or Lynn Allen's blogs in the links below and to the left you can start to find out what is being introduced and improved.
Wednesday, March 02, 2005
SelectSimilar
In Civil 3D there is no reference in "Help" anywhere to a command that is found when you select something(s) and right-click to bring up a shortcut menu. At the bottom of the pop-up menu you will see "Select Similar". The SELECTSIMILAR command, which can also be entered at the command line, will select/highlight all objects that are the same as the one(s) you have selected. I have found this to be a very easy way to select all objects of a particular type.
By the way, this same command can be found in Land Desktop 2005.
By the way, this same command can be found in Land Desktop 2005.
Tuesday, March 01, 2005
Speaking of Stepping Forward
Do not forget that Civil 3D 2005, like all of the 2005 products, has the ability to control the the display order of hatch patterns as they are created. You can choose between:
Do not assign
Send to back
Bring to front
Send behind boundary (this is the Default)
Bring in front of boundary
After they are created it is also possible to control display order with the enhanced HATCHEDIT command. You can choose between:
Do not change
Send to back
Bring to front
Send behind boundary
Bring in front of boundary
Monday, February 28, 2005
Will All Text Please Step Forward
I had occasion to use the TEXTTOFRONT command today. It allows the user to automatically grab all of the Text, or all of the Dimensions, or Both, and "bring them to front". It is very quick and easy to use.
Friday, February 25, 2005
Lynn Counts Blocks
In her blog, Lynn Allen offered what I thought was a very elegant and easy way of count blocks in a drawing.
This is accomplished by using the EATTEXT command which brings up the Attribute Extraction Wizard. If we press the "NEXT>" button three times, to accept the defaults for the first three screens of the wizard, we end up at a table with all of the blocks listed and counted. Do not forget that you can size the dialog box to view more data at once.
This is accomplished by using the EATTEXT command which brings up the Attribute Extraction Wizard. If we press the "NEXT>" button three times, to accept the defaults for the first three screens of the wizard, we end up at a table with all of the blocks listed and counted. Do not forget that you can size the dialog box to view more data at once.
Wednesday, February 23, 2005
Catch a Coordinate
The Coordinate Tracker in Civil 3D can be a useful way to VIEW and USE the X and Y values of your cursor location and a Z value from a surface.
To call up the Coordinate Tracker use the General pull-down, select Utilities, then select Coordinate Tracker from the flyout menu.
When it is present you can first select within it a surface from which it will display the elevation of the cursor location. You can then select the Coordinate Capture Keys (by default this is Ctrl+Shift+Z) to lock in the X,Y,Z, values.
There are also buttons that allow you to push the X,Y the Z or the X,Y,Z values as they were captured or edited versions to the command line.
Friday, February 18, 2005
Label Scaling Simplified
Labels in Autodesk Civil 3D follow very simple yet useful rules.
In Model Space the label size is a multiple of the drawing scale and the label style text height. A label style text height of .1 in a 1:20 scale drawing would create a 2 foot tall label. A label style text height of .2 in a 1:40 scale drawing would create an 8 foot tall label.
In Paper Space it is even simpler. A label always appears the exact height of the label style's text height. This is irrespective of the viewport's zoom magnification also referred to as viewport scale. A label text height of .1 will always plot as .1 inches.
These rules also apply to labels that you xref. As mentioned in an earlier post that means labels are only created once and can be used for drawing at different scales.
Tuesday, February 15, 2005
LandXML Part II
With LandXML you can import the following types of data into Civil 3D:
COGO points
Point groups
Surfaces
Parcels
Alignments
Alignment profiles
Note: The LandXML Import command does not support cross sections.
Note: The LandXML import functionality automatically handles the conversion between the units specified in the LandXML file and the current drawing units.
Note: LandXML does not transform coordinate systems automatically, so no specific coordinate system transformation is applied other than what is specified by the translation and rotation settings.
You can export the following types of data from Civil 3D:
COGO points
Point groups
Surfaces
Watersheds
Parcels
Alignments
Alignment profiles
Alignment cross sections
COGO points
Point groups
Surfaces
Parcels
Alignments
Alignment profiles
Note: The LandXML Import command does not support cross sections.
Note: The LandXML import functionality automatically handles the conversion between the units specified in the LandXML file and the current drawing units.
Note: LandXML does not transform coordinate systems automatically, so no specific coordinate system transformation is applied other than what is specified by the translation and rotation settings.
You can export the following types of data from Civil 3D:
COGO points
Point groups
Surfaces
Watersheds
Parcels
Alignments
Alignment profiles
Alignment cross sections
Monday, February 14, 2005
LandXML
Although, it has been around since Land Desktop Release 2i as an extension (this was version 0.88) and Land Desktop 3.01 in its current version (version 1.0) LandXML is not often the first solution users think of when it is necessary to transfer data between different applications, or between different offices or users.
LandXML is a non-proprietary data standard created by a consortium of industry partners.
It can be used for any of the following:
1. To transfer data from a supported software application to another supported application (like LDt to Civil 3D).
2. To archive data at important milestones.
3. To convert data from imperial units to metric or vice versa.
4. To globally translate/rotate coordinates.
Click on the title of this post to get to the LandXLM.org website.
Wednesday, February 09, 2005
Cad Digest
The Cad Digest website has a specific area they call "Autodesk Civil 3D Reading Room". It contains links to information about Civil 3D. They title the different sections "Features", "Tutorials", and "Reviews". This can be a good source of information.
Click on the title above to get to this site.
Click on the title above to get to this site.
Tuesday, February 08, 2005
Blog Stats
Just a quick note about this blog.
In one month we have had over 3,500 page views, by over 1300 different visitors, from 71 countries.
In one month we have had over 3,500 page views, by over 1300 different visitors, from 71 countries.
Monday, February 07, 2005
Cause and Effect
When you edit this object type...These objects are updated...
Points--------------------------------Surfaces
Surfaces-----------------------------Grading, Profiles
Parcels-------------------------------Grading, Corridor
Alignments--------------------------Grading, Corridor, Profiles, Sections
Grading------------------------------Surfaces, Corridor
Subassembly------------------------Assembly, Corridor
Assembly----------------------------Corridor
Thursday, February 03, 2005
Named Layer Filters
Named Layer Filters (NLFs) have become a big issue with Autodesk 2005 products and Civil 3D is no different. For most Autodesk 2005 products their respective Service Pack 1's addressed a slow opening Layer Property Manager (LPM). They do so basically by ignoring all Pre-SP1 NLFs. They are still present, just not visible.
We often receive inquiries about the length of time it takes for the LPM to open. With the service packs installed older named Layer Filters, although still present, are ignored and not visible, in the LPM. This allows for the LPM to open quickly. The interesting fact is that these same named layer filters are still visible is pre-SP1 versions of the software.
After the installation of the SP1's, the moment a new Named Layer Filter is created all old layer filters were removed and only the new ones are left.
Either way this points out that many users have a tremendous amount of WASTED drive space because their drawings contain dozen, hundreds, even thousands of unused, unwanted, or unneeded Named Layer Filters. It is not unheard of that a typical drawing contains several dozen NLFs. These NLFs may constitute 100s of KBs of drawing size. If this is multiplied by the hundreds, or thousands of drawings on company hard drives, we have much wasted space!
This was all perpetuated by a practice that many consider a bad practice. That is to save a drawing to a new name and then erase all existing objects instead of using a drawing template (.dwt). This left the drawing with all of its existing NLFs. This coupled with the fact that all versions of Autodesk products up through 2004, when used to "Drag 'n Drop", "Copy/Paste", or "Wblock" an object from one drawing into another would copy all the NLFs from the 1st drawing into the 2nd. NLFs have propagated over the years to give us the current problems.
Users should be aware of the Named Layer Filters and take steps to manage them. There are many ways to remove unwanted NLFs.
By the way, the propagation of NLFs does not occur with the 2005 products.
Tuesday, February 01, 2005
What's in a Name?
While rooting around in the Autodesk Civil 3D 2005 Help system, I ran across the following:
Object and style names restrict the use of certain characters.
When naming an object or style, do not use the following characters:
< (less than)
> (greater than)
/ (forward slash)
\ (backward slash)
+ (plus sign)
“ (double quotes)
: (colon)
; (semi colon)
= (equals)
| (pipe)
, (comma)
* (asterisk)
? (question mark)
‘ (single quote)
It seemed obvious. But one should never assume.
Monday, January 31, 2005
Inquire Within
In Land Desktop some users accessed line and arc data from the "Inquiry" pulldown by selecting "Line/Curve/Spiral". After selecting an entity they would see the object's data.
Today, in Autodesk Civil 3D 2005, the same data is accessible from the "General" pulldown, select "Inquiry" then select "Line and Arc Information". Surprisingly, it takes one click more than it used to.
Today, in Autodesk Civil 3D 2005, the same data is accessible from the "General" pulldown, select "Inquiry" then select "Line and Arc Information". Surprisingly, it takes one click more than it used to.
Wednesday, January 26, 2005
Workflow Guides
Civil 3D 2005 has something new in help. It contains "Workflow Guides". These guides provide overviews of how to perform common tasks, and contain links to relevant procedures. They include:
Points Workflow Guide
Surfaces Workflow Guide
Grading Workflow Guide
Parcels Workflow Guide
Alignment Workflow Guide
Profile Workflow Guide
Sections Workflow Guide
Corridors Workflow Guide
Labels Workflow Guide
The guides tend to be a little more specific at guiding users with the use of the product.
To find them just type "workflow guides" on the "Search" tab in help. The No. 1 ranked topic listed will be "Using the Workflow Guides". The "Parcels" link is broken. But, you will find the rest at this location.
Grading Slopes
I recently revisited one of the enhancements to Grading in Civil 3D 2005. It is the ability to force a slope direction for instances where the first solution would be opposite of my desired cut or fill slope.
What this means is that traditionally if a grading object was in a depression or valley but still above a surface it could only grade "DOWN" to the surface because it is above the surface. Now I can force it to grade "UP" and catch the sides of the depression or valley. This ability, is of course, a very welcome addition.
What this means is that traditionally if a grading object was in a depression or valley but still above a surface it could only grade "DOWN" to the surface because it is above the surface. Now I can force it to grade "UP" and catch the sides of the depression or valley. This ability, is of course, a very welcome addition.
Monday, January 24, 2005
Free VBA Gold
James Wedding P.E. is highly respected in Land Desktop and Civil 3D user circles. He taught at Autodesk University. He also just presented the January 21st Civil 3D webcast.
James has posted on the Civil 3D Discussion Group a VBA app that has three very worth while capabilities. They are called "SetPoints", "PointsToSurface", and "AlignStyleChange2"
"SetPoints" allows you to set points in plan view based on an elevational difference from a profile. Many users have used similar tools to set lot elevations based on centerline profiles.
"PointsToSurface" allows you to select a Point Group and a Surface. It then modifies the points to reflect their elevation on the surface.
"AlignStyleChange2" allows you to change one or many alignments' styles at once.
Together the 3 tools are very useful in enhancing Civil 3D. I highly recommend you download and try them out. The specific thread is titled "C3D Webcast DVB File". For anyone wishing to explore VBA they can be very helpful in understanding some of the basic procedures.
Click here to connect via you internet browser.
Click here to choose newsreader access.
Thank you James!
James has posted on the Civil 3D Discussion Group a VBA app that has three very worth while capabilities. They are called "SetPoints", "PointsToSurface", and "AlignStyleChange2"
"SetPoints" allows you to set points in plan view based on an elevational difference from a profile. Many users have used similar tools to set lot elevations based on centerline profiles.
"PointsToSurface" allows you to select a Point Group and a Surface. It then modifies the points to reflect their elevation on the surface.
"AlignStyleChange2" allows you to change one or many alignments' styles at once.
Together the 3 tools are very useful in enhancing Civil 3D. I highly recommend you download and try them out. The specific thread is titled "C3D Webcast DVB File". For anyone wishing to explore VBA they can be very helpful in understanding some of the basic procedures.
Thank you James!
Monday, January 17, 2005
SP1 & Subassemblies
One of the nice changes that you get when you install Service Pack 1 for Civil 3D 2005 is that several Subassemblies get updated and now have a new capability.
Specifically, LaneBrokenBack, LaneInsideSuper, LaneOutsideSuper, LaneTowardCrown: Added a runtime logical assignment that allows the user to tie the elevation of the outside edge-of-lane to a profile.
Occasionally, I found that I wanted to use the old versions but without the ability to attach them to a profile they had slightly limited use.
The issues resolved were good to have. But, this was a nice little surprise.
By the way, I had no problem installing the Service Pack.
Friday, January 14, 2005
Service Pack 1 is Here
Service Pack 1 is now available for download for Civil 3D 2005. Click on the title above to get to the download page on the Autodesk website.
This update is currently only available via download. The Communication Center does not yet notify users that it is available.
There have been a few users with installation problems that Autodesk is currently trying to resolve.
This update is currently only available via download. The Communication Center does not yet notify users that it is available.
There have been a few users with installation problems that Autodesk is currently trying to resolve.
Thursday, January 13, 2005
Case-Sensitive Names
I found it interesting that in Civil 3d, object names and style names are case-sensitive. This means that you could have an Alignment named "A1" and another named "a1".
Friday, January 07, 2005
Parcel Layout Suggestions Wanted
In the Civil 3D discussion group, Dave Simeone the Civil 3D Product Manager, asked for input in order to validate a requirement for parcel sizing. This is our opportunity to comment on capabilities the software should have in order to best address our needs. If parcel sizing is important to you, you may want to be heard regarding this matter.
Click here to connect via your internet browser.
Click here to choose newsreader access.
Service Pack 1 is Coming
Dave Simeone, the Autodesk Product Manager for Civil 3D, announced today, in the Civil 3D Webcast, that Autodesk expects to make Service Pack 1 available for Civil 3D 2005 sometime next week (the week of the 10th-14th).
Download
If you watch the Autodesk Civil 3d Webcasts on Friday, have you wanted to re-see or have the Powerpoints that they use. You can download PDF versions of them while you are watching.
Let me explain. During the Webcast if you enter "Ctrl+P" or select the "File" pulldown in the "Live Meeting" screen then select "Print to PDF", a PDF file of the Powerpoint will load on your machine. You can then either print or save it to a file.
This allows you to revisit much of the important content from the session.
Wednesday, January 05, 2005
Share
I have often been asked how does one share an Autodesk Civil 3D 2005 (C3D) drawing with someone with "basic" AutoCAD.
There are three most common results possible:
1. Share the dwg as is. It can only be opened in AutoCAD 2004 or 2005. They will see the C3D objects as Proxy Graphics
2. Share the dwg as is with someone who has the Civil 3D Object Enabler installed. It can only be opened in AutoCAD 2004 or 2005. They will see the "objects" as they are and can get properties and information from them.
3. I can use one of the two "Export To AutoCAD..." commands. These commands create a new drawing and explode all of the Civil 3D Objects into Basic AutoCAD entities per their appearance at that moment in the view in which the command is run. The commands are "EXPORTTOAUTOCAD2004" and "EXPORTTOAUTOCAD2000". These commands can also be found under the "File" pulldown > "Export to AutoCAD" flyout. The ...2000 version creates a 2000 format dwg which can be opened in AutoCAD's 2000, 2000i, 2002, as well as 2004 & 2005.
Tuesday, January 04, 2005
Roadway Reconstruction
This Friday the Autodesk Civil 3D Webcast is titled "Civil 3D for Road Reconstruction". The webcast takes place from 9am to 10am Pacific time. I find these webcast very useful for understanding the software.
To view click the title above or the link below.
http://www.placeware.com/cc/autodesklearning/join?id=Civil0107&role=attend&pw=Civil3D
You must phone in to hear the audio.
Audio Information:
USA Toll Free Number: 888-593-9101
USA Toll Number: 1-773-799-3910
Leader: Heather MacKenzie
Passcode: Civil 3D
To view click the title above or the link below.
You must phone in to hear the audio.
Audio Information:
USA Toll Free Number: 888-593-9101
USA Toll Number: 1-773-799-3910
Leader: Heather MacKenzie
Passcode: Civil 3D
Monday, January 03, 2005
Swapping Edges = Flipping Faces
As I have tried to equate capabilities in Autodesk Civil 3D 2005 to how Land Desktop worked, I find I like many of the new terms better.
When needing to fine tune a surface in Land Desktop we often used the "Flip Face" command. This command name was often misinterpreted.
Now the command is called "Swap Edge". I feel it is slightly more meaningful. We access this command by going to the Prospector Tab expanding the "Surfaces" collection, expanding the surface to edit, expand "Definition", Right-click on "Edits" and select "Swap Edge".
Note: You must have triangle edges visible in your surface style in order for the command to activate.
Subscribe to:
Comments (Atom)
