Today, Autodesk posted Service Pack 2. It Includes Autocad 2006 SP1, Map 2006 SP1, as well as Civil 3D 2006 SP1. The service pack resolves issues in many segments of the product ie. Points, Alignments, etc.
The title of this post is linked to the Service Pack 2 download Page.
Note: You must also install Land Desktop 2006 Service Pack 1 in order to use the migration capability in Civil 3D 2006 or if these two products are both installed on the same machine.
Friday, September 30, 2005
Wednesday, September 28, 2005
Documentation Input
I occasionally hear users make comments about the quality of the help system in applications. Well, here is your chance to make those comments directly to Autodesk. The title links to a 17 question user survey on Documentaion.
Autodesk is asking for your experience with...
Civil 3D (3 Questions)
Getting Started Guide (4 Questions)
Online Help (7 Questions)
Tutorials (3 Questions)
Autodesk is asking for your experience with...
Civil 3D (3 Questions)
Getting Started Guide (4 Questions)
Online Help (7 Questions)
Tutorials (3 Questions)
Tuesday, September 27, 2005
Mini Demonstrations
For anyone interested in introductory demonstrations of Civil 3D the title of this post is linked to the "Demonstration" page at the Autodesk website. There you will find links to eight short (2-3 Minutes) demonstation on the following subjects.
User Interface
Surfaces
Styles
Points
Data Shortcuts
Alignments
Profiles
Corridor Model
Useful in showing the capabilities of these features, a viewer can also follow the steps and learn a little bit of the Language of Civil 3D.
User Interface
Surfaces
Styles
Points
Data Shortcuts
Alignments
Profiles
Corridor Model
Useful in showing the capabilities of these features, a viewer can also follow the steps and learn a little bit of the Language of Civil 3D.
Monday, September 26, 2005
SAVE It
This is simple. Lets see if you are familiar with it. Most are not.
I often ask users what is the easiest way, straight out of the box, to access the "SAVE" command. Many will reply the "Diskette" icon on the "Standard" ("Civil 3D Standard" in Civil 3D) toolbar, Its tooltip says "Save CTRL+S". This is not the correct answer. They are referring to the Qsave command, verifiable by hovering over the button and reading the button description in the bottom left hand corner of the screen.
Typically the next answers are the "Save" or "Save As..." commands found on the "File" Pulldown menu. No, these refer to the QSAVE command, once again, and the SAVEAS command respectively.
The only way to initiate the SAVE command is to type it. Why is the SAVE command important? Because it can save you time. I have watched users do a SAVEAS command and type in a new file name. The problem is the they are now in that file with the new name. They then "CLOSE" that file and "OPEN" the original file that they were in.
With the "SAVE" command you can type a new file name, create that file, but you will remain in the original file.
By the way both the "SAVEAS" and "SAVE" commands bring up the "Save Drawing As" dialog box. The only difference is the results.
So, did you know it?
Google Video + Autodesk = FIRST
Google now does video. The Link above is for the Google Video search results page for the word "AUTODESK". I am posting this because the "first" several results are about FIRST (For Inspiration and Recognition of Science and Technology).
FIRST 's main purpose is to inspire an appreciation of science and technology in young people. Founded by Dean Kamen (the inventor of the Segway - Human Transporter) FIRST 's goals is "...to create a world where science, and technology are celebrated...where young people dream of becoming science and technology heroes..."
I have had the honor of hearing Mr. Kamen give a keynote speech and when it comes to providing direction and alternatives to young people this group has done so.
I have often been inspired by the accomplishments of this group and had to mention them.
I have had the honor of hearing Mr. Kamen give a keynote speech and when it comes to providing direction and alternatives to young people this group has done so.
I have often been inspired by the accomplishments of this group and had to mention them.
Friday, September 23, 2005
Style Management
Land Desktop users are finding that the procedures that they are accustomed to following are significantly reduced with Autodesk Civil 3D 2006. Creating & designing is accomplished more easily with Civil 3D.
For many their "New" challenge is managing the styles that they need to create and use. Because Civil 3D object styles reside in a drawing (similar to Page Setups) we should have a plan as to how to insure we have appropriate styles available when we need them. Although there are many styles that come "in the box" these should be considered a good starting point for your custom styles. We know we will have to make styles to use in the future, we also know that we will have to continue to create new styles and tweak the old ones.
Here is my plan.
I have a template (.DWT) file that contains the styles that I have created up until now. I have also saved this file as a drawing (.DWG) with the same name.
For New Drawings: I simply use the template to create my new drawing. Nothing surprising there.
For Existing Drawings that do not contain my needed styles: I insert the template file that I saved as a drawing (.DWG). When it asks me for the insertion point I cancel the command. This will introduce my styles into that file.
For Existing Drawings that do not contain my needed styles (Alternative): I create a new drawing from my template and insert the entire drawing (without the styles) into the newly created one and then save to the old name.
So far so good. But here is when things start to get a little tricky.
For styles that I create while in working files: I immediately open my template file and drag-and-drop the new style(s) from the toolspace "Settings" tab straight in to my template and save it. I also immediately save my template file as the drawing (.DWG) mentioned above. I will post about the "SAVE" command at another time.
Other methods of course are possible. Input anyone? The important part is to have a PLAN of some sort to manage the styles. With 83 objects that can have styles, we need a PLAN in order to be efficient.
I certainly appreciate the fact that larger organization will have a structure in place to handle "Object Styles". Not every user can, nor should be making styles unregulated. For those organizations that have a good library of style in place this can be a tremendous advantage for them. Imagine designing something and it be as it will appear in the final drawing.
Tuesday, September 20, 2005
LandXML Accuracy
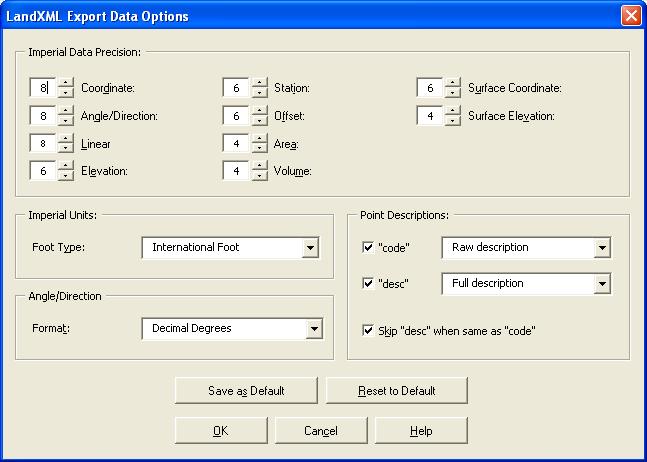
I had recently received a LandXML file created in Land Desktop 2006 that was curious in that all of the values were rounded to whole numbers. After a little investigation we found that the creator of the LandXML file unknowingly had the Precision set to zero (0) decimal places for all values when exporting to LandXML.
Prior to exporting to set or review the settings for LandXML in Civil 3D 2006 we should in the "Toolspace" palette, on the "Settings" tab, right-click on the drawing name and select "Edit LandXML Settings..." (See Image).
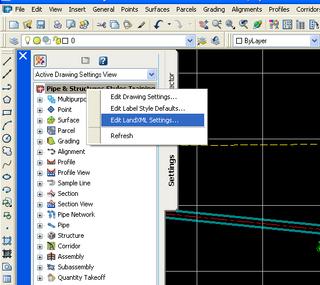
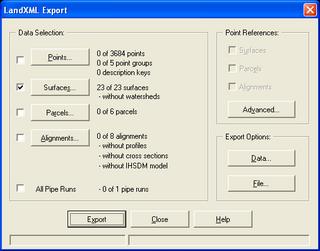
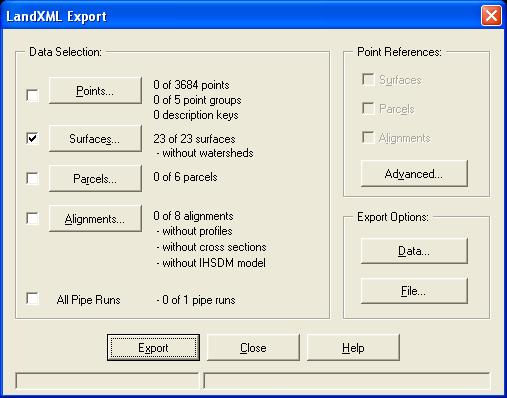
To do similar in Land Desktop 2006 from the "Projects" menu pulldown select the "Export to LandXML..." command. In the "LandXML Export" dialog box we press the "Data..." button under "Export Options:"
You will see the following dialog box.
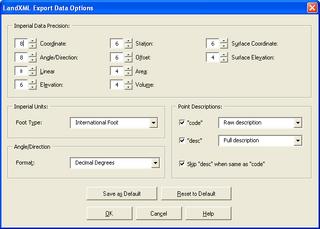
If there is one thing that I have learned in this business, that is to "Always Double Check!"
Prior to exporting to set or review the settings for LandXML in Civil 3D 2006 we should in the "Toolspace" palette, on the "Settings" tab, right-click on the drawing name and select "Edit LandXML Settings..." (See Image).

To do similar in Land Desktop 2006 from the "Projects" menu pulldown select the "Export to LandXML..." command. In the "LandXML Export" dialog box we press the "Data..." button under "Export Options:"
You will see the following dialog box.
If there is one thing that I have learned in this business, that is to "Always Double Check!"
Service Pack 2 is Coming

I had almost forgotten that Service Pack 2 for Autodesk® Civil 3D® 2006 will be released very soon. I recall hearing near the end of September.
The link above gets you to the Autodesk webpage for Updates and Sevice Packs. This is where you will find the Service Pack when it is released.
Friday, September 16, 2005
Name the Parts

When creating Assemblies it is a good habit to get into to name the Subassemblies components. This will eliminate confusion when it is time to "Set Logical Names".
To name a Subassembly you can...
1. Select (highlight) the Subassembly component within an Assembly and modify the "Name" field in the Properties Palette.
or you can...
2. Select the Assembly (the centerline) Right-click and select "Assembly Properties" from the Short-cut menu. In the "Assembly Properties" dialog box select the "Construction" tab. In the Item window Right-click on an item, select "Rename" and give the item a more definitive name (see image). Repeat for every item.
Trust me when I say this will help you a great deal later.
Thursday, September 15, 2005
Zoom to or Pan to

Here is a quick tip. When working with users of Civil 3D 2006 they often forget to "Zoom to" or "Pan to".
What do I mean? On the Prospector tab of the Toolspace Pallette we can see the different objects contained within the current drawing. We can see the Parcels, Alignment, Surfaces etc. If we right-click on any of the objects, a Short-cut menu will appear and we can choose "Zoom to" which will zoom extents on the chosen object. Or, we can "Pan to" which will pan, at the current zoom magnification, to the centroid of the selected object. Which may not show us the object at high magnifications, especially with alignments.
Friday, September 09, 2005
Free DVD!
 I just received the Infrastructure Solutions Webcasts DVD in the mail. It contains, by my count, 65 recorded webcasts. Autodesk says that in contains 70, I guess I am missing 5 :^) .
The breakdown of the sessions are:
32 Civil 3D
17 Map 3D
13 MapGuide
3 Raster Design
The DVD contains the majority of the recorded session from the first one in January of 2004 until February 28th of 2005. Dave Simeone mentioned in today's webcast that there is a second DVD planned with the remain sessions which would be 24 and counting.
I can not think of a more cost effective way to get so much information about Civil 3D.
Order yours TODAY!! OPERATORS ARE STANDING BY!!
Oh, I guess I got a little carried away.
What Happened to Comments?
Unfortunately, there have been individuals that have used the comments capability of this Blog to post SPAM. This is a sad reality that affects many.
That is why I have chosen to temporarily prevent the ability to add comments until further notice.
:^(
That is why I have chosen to temporarily prevent the ability to add comments until further notice.
:^(
Thursday, September 08, 2005
Importing Points Part I
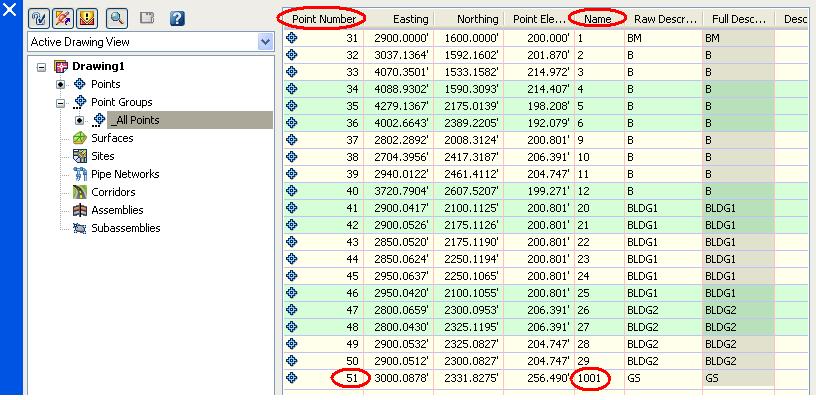
We know that there are several ways to import point data into Autodesk® Civil 3D® 2006. We can...
1. Import Points from an ascii file.
2. Use LandXML to transfer the points.
3. Use the
Not everyone knows that methods 1 and 3 will give us better results.
Why? Well unfortunately the LandXML format stores the point's number as
< CgPoint name="PointNumber"... >.
When the LandXML point data is imported into Civil 3D it is read as the Point Name NOT the Point Number. It will be handled as not having a number and will be automatically sequentially numbered.
Note: It is not possible to Use the "Import Data from Land Desktop..." (IMPORTLDTDATA) command to import the point data directly. This only supports the importation of Description Keys, Surfaces, Alignments, and Parcels.
Friday, September 02, 2005
Imageframe
This week we had a client contact us that requested ways to automate the turning ON and OFF of the IMAGEFRAME setting within his drawings. We shared with him something that can be easily overlooked. IMAGEFRAME now has a NEW value available. It has always been able to be set to...
0 Image frames are not displayed and not plotted.
1 Image frames are both displayed and plotted.
But, it can now be set to...
2 Image frames are displayed but not plotted.
With this new value we should not ever have to change it again.
By a timely coincedence Lynn Allen wrote about this in herBlog on Wedneday August 31st.
0 Image frames are not displayed and not plotted.
1 Image frames are both displayed and plotted.
But, it can now be set to...
2 Image frames are displayed but not plotted.
With this new value we should not ever have to change it again.
By a timely coincedence Lynn Allen wrote about this in her
Subscribe to:
Posts (Atom)
