Showing posts with label LDt. Show all posts

Monday, June 01, 2009

Old Styles Are Back Again

A friend just mentioned that...

AutoCAD Land Desktop Style Converter Extension for AutoCAD Civil and Civil 3D 2010

... was now available for download at the Autodesk Subscription Center

This extension converts some Land Desktop styles and/or project settings for:

Layers and text styles
Line, curve and spirals
Points
Contours and surfaces
Alignments, profiles and pipes

and creates equivalent Civil 3D styles and settings via a wizard. I recommend that you download this extension and give it a try.

Be Better!  ...learn about the tools you have available.


Tuesday, June 17, 2008

Last Land Desktop

The title of this post will get you to the official Land Desktop Page on the Autodesk website. If you now visit that page you will find information about the current version (2009) being the LAST version of Land Desktop (there will not be LDT 2010).

Some will welcome this news others obviously will not. Which ever the case it is now official.

Be Better...Try Something New!

Monday, August 13, 2007

Land Desktop Companion 2008 SP1

I had not yet mentioned that Service Pack 1 for Land Desktop Companion 2008 was made available earlier this month.

Wednesday, December 20, 2006

Land Desktop Service Pack 2A Released

Back on December 11th, Autodesk released Service Pack 2A for the Land Desktop products. Yes, I said products. Depending on which product you use you will need either...

Autodesk Land Desktop 2007 Service Pack 2A

or

Autodesk Civil 3D—Land Desktop Companion 2007 Service Pack 2A

Note: These pages contain information on how to verify the correct version if you are not absolutely certain.

Monday, December 04, 2006

NEW! Project Management Document

Newly added to the bottom of the Civil 3D Service Pack 3 page is a document (over 80 pages) titled:

"Project Management in Autodesk Civil 3D 2007".

This is a very comprehensive document prepared specifically for Service Pack 3. The introduction states:

"The content will appear in an updated form in the online User’s Guide for Autodesk Civil 3D 2008."

Sections include:
Transition from Land Desktop
Using External References
Managing Data Using Data Shortcuts
Managing Data Using Vault
Vault Best Practices
Migrating Old Autodesk Civil 3D Projects
Detaching a Drawing from a Project

This is a large and VERY helpful document.

Tuesday, November 28, 2006

Autodesk Civil 3D 2007 Reconfigured!

As of yesterday NEW (or Crossgrade) seats of Civil 3D 2007 will include Autodesk Civil Design and Autodesk Survey in the box. So that means when anyone buys Autodesk Civil 3D 2007, they will get...

Autodesk Civil 3D 2007
Autodesk Land Desktop 2007
Autodesk Civil Design 2007
Autodesk Survey 2007

Additionally, subscriptions (new and renewal), for Autodesk Civil Design and Autodesk Survey are being discontinued.

What this does to owners of existing multi-year subscription contracts for Civil Design and Survey, is still to be determined.

Wednesday, November 15, 2006

Civil 3D 101 - The First Decision

Things seem to be turning a corner. Many organizations are making their first forays into using Civil 3D. They are perhaps hearing of others having success with their efforts, however small, with Civil 3D.

So how does one begin? With Training.

No, how does one begin to use the product? Oh, well once we launch Civil 3D 2007 we have to begin a new drawing preferably from a template. Our chooses are:

_Autodesk Civil 3D (Imperial) NCS Base.dwt - Contains one, and typically only one, style named BASIC for every style-able object. (221 KB)

_Autodesk Civil 3D (Imperial) NCS Classic.dwt - Contains many styles per style-able object. Contains certain styles that mimic Land Desktop as much as possible. (433 KB)

_Autodesk Civil 3D (Imperial) NCS Extended.dwt - Contains many styles per style-able object. (430 KB)

All styles use layers based on the National CAD Standards.

If no custom styles are available I tend to start with the third template.

Oh, I did not mention that there are three equivalent templates for METRIC drawing.

Friday, November 10, 2006

Land Desktop Service Pack 2 News

During today's Civil 3D webcast, Dave Simeone, Autodesk Civil 3D Product Manager, mentioned that a problem(s) had been found with Service Pack 2 for Land Desktop (He was not specific about the issue(s)). So, Autodesk has removed the download from the website.

He stated that if anyone has downloaded the Service Pack but has not yet installed it, do not install it. They will be posting a new Service Pack as quickly as possible.

There was no mention of what those of us that have already installed it should do. If you have, and are having issues, I am guessing that an Uninstall/Reinstall may be the best course of action.

Bummer.

To reiterate this only has to do with Land Desktop 2007 and Service Pack 2.

Friday, October 27, 2006

Multiple Contour Labels

We here at KETIV Technologies recently received an inquiry as to whether or not it was possible to label contours lines with many labels at once, similar to how Land Desktop does it. The following information was prepared and contributed by Daniel Granillo, a co-worker here at KETIV.

Create Multiple Contour Labels like in Land Desktop using Civil 3D
Procedure:
1. Click Surfaces menu > Labels > Add Contour Labels
2. On the "Create Contour Labels" toolbar, select "Label Multiple Group Interior"

Note: This will enable the Multiple Group Interior edit box where you enter the desired spacing interval.

3. Enter a desired distance for the spacing interval in the field provided

4. Select a start point and endpoint for the contour label line.
5. Repeat Step 4 as needed
6. Press Enter to end the label creation process.

Tip: After creating your contour labels, you may want to turn-off the label line layer and/or make it non-plot-able (By default the contour label lines are placed on the DEFPOINTS layer).

Thanks Daniel I am sure this will help.

Thursday, October 26, 2006

Design Profile View vs Construction Document Profile View

Ghosts of the Past
Somethings that some Autodesk Civil 3D users can not easily get away from are their Land Desktop habits, procedures, and knowledge. When it comes to profiles most former LDt users limit themselves to one profile view for one profile because that is what they were limited to by Land Desktop (it would ask to erase the older info). If they had more than one representation of a profile and one was edited the other would immediately be out of date. So why do it?

The Present
Now with Civil 3D and dynamic updates, I often find it useful to have at least two profile views showing the same geometry (profile) but each view is very different in appearance, and the annotation within them is different.


In the above example I have a view that allows me to see the data that I find useful for designing and the other view is what will be used in the construction document. If either is edited the other will always update, thus remaining current.

The Future?
A similar concept can apply to master design profiles that one person is responsible for and either Vault reference profiles or shortcut reference profiles that are read-only. These second profiles can be the responsibility of drafters to pretty-up (make construction document ready). These second profiles (some are referring to these as DRef's) will update entirely (annotation and all) whenever the master is modified. The first would be the sole reponsibility of the designer or engineer.

These new concepts take full advantage of the software. There are many other examples where we will want to change our old habits or processes to create a more efficient or productive workflow. I often see workflows entrenched in organizations because thats how it was done in Softdesk, or Land Desktop, or (your favorite older application here). Because we need to be more efficient... being open to such changes can be very profitable.

Tuesday, October 17, 2006

We Wish, Jeff Shares

Jeff Mishler, of Santa Rosa, CA, has created some lisp & VBA routines that he has made available for all to benefit from. The most recent one that I have seen addresses a request that someone had in the Civil 3D discussion group. They asked for a routine, similar to a Land Desktop command, that would "list all available point numbers". Jeff's routine named FreeNums does just that.

Jeff has also created a routine that is currently being shared in the Civil Engineering Community. The lisp routine named "Alignment Tooltips tools.lsp" turns tooltips on/off for all or selected alignments. (You have to be registered with the community in order to download this file.)

Rotate_Markers allows users to to rotate the marker and labels of selected points. (For this one you will have scroll down and find the code in order to copy and paste it and save to a .lsp file)

Lastly, the Rebuild_All_Corridors (copy and paste required here as well) routine rebuilds all selected corridors or if none are selected it rebuilds ALL corridors.

I would personally like that thank Jeff for being generous enough to share these tools, and his talents, with our entire community.

He shared with me the fact that he usually monitors the Civil 3D Wishes Discusion Group, and the fact that he looks for code/solutions/workarounds for just about every wish. So, if you have a wish for a command or capability in Civil 3D do not hesitate to ask for it in the Wishes Discussion Group. Best case someone (ie. Autodesk, Jeff, or someone him) will answer your wish. No need for a genie.

Monday, October 09, 2006

A.C.E.S. Landed


Last Thursday evening (October 5, 2006) the Autodesk Civil Engineering Solutions (A.C.E.S.) User Group of Southern California held their inaugural meeting at the University Marriott in Fullerton, California. There were employees present from over a dozen engineering firms and several municipalities. By all accounts it was a great success. The intended goals of Share, Network, Learn seemed to be well addressed during this first meeting.

The evening began with dinner. Then Pete Kelsey, Autodesk Technical Evangelist, presented an "Industry Overview" (where have we been, where are we, and where are we headed?).

I did a "Technical Presentation" which was titled "Civil 3D on a Dime". Intended for organizations that have not yet cracked open the Civil 3D box. This section covered Civil 3D capabilities that we can use with very little or no training/investment, and take advantage of Autodesk Civil 3D 2007 to support whichever application we may use currently. These capabilities included taking data from Land Desktop into Civil 3D in order to do...

--Earthwork Volume Calculations (2 commands, 10 steps, 45 seconds)
--Translate and Rotate a Surface (4 Commands, 10 steps)
--Parcel(s) Lot Line Adjustment (3 commands, 11 steps)
--Create Geometry for an Alignment (2 commands, 8 steps)
--Renumber Parcels (2 commands 12 steps)

KETIV Technologies gave everyone in attendance a CD with custom styles and expressions to jumpstart the use of these items in Civil 3D. The evening ended with an open forum segment and announcements.

If the first meeting is any indication, there will be lots of benefits to members of this user group. The next meeting is scheduled for Thursday January 11 (location to be determined). Mark the date on your calendar, and invite your co-workers. This is a free and easy way to get information about our industry and the applications that we use.

Tuesday, September 05, 2006

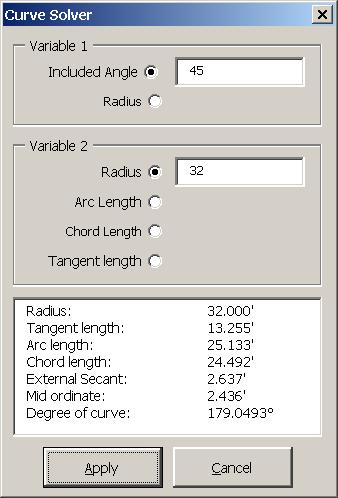
Curve Solver Utility


Several Civil 3D users had requested a curve solver tool similar to what is available in Land Desktop. Well Peter Funk, of Autodesk, provided a .dvb tool that can be loaded to the "Toolbox", which is a tab of the "Toolspace".

In order to use this tools we need to...

1. Download "Curve Solver" utility from the Civil 3D Community Utilities Page.
2. Unzip and store .dvb file.
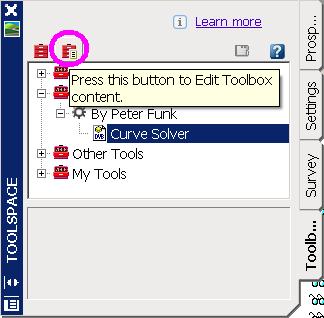
3. Select "Toolbox" from the "General" Menu pulldown.
4. Select "Edit Toolbox content" icon (See image - second red icon).


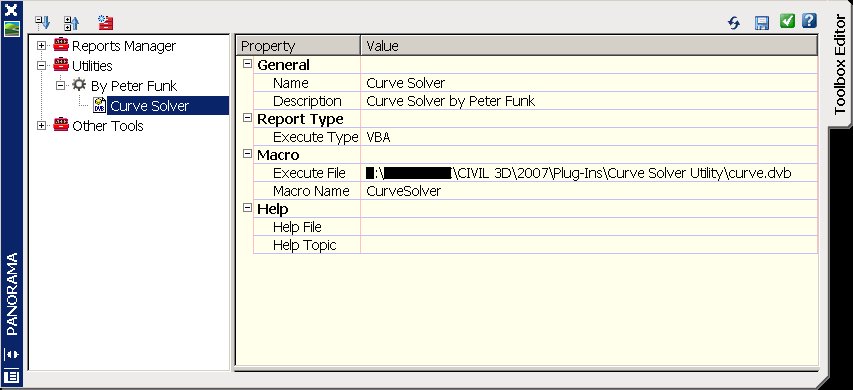
5. In the "Toolbox Editor" vista of the "Panorama" create desired Categories.
6. In the "Toolbox Editor" vista of the "Panorama" Rt-click and choose "New Tool".
7. Configure new tool similar to image below.


8. Press Green Checkmark to save and close "Panorama".
9. Double-click tool in "Toolbox" to use.

Thanks Peter, this will help.

Wednesday, August 30, 2006

A.C.E.S. Flying into Southern California


The control tower has given final clearance for A.C.E.S. to land here in Southern Califonia. What is A.C.E.S. you may ask? A.C.E.S. is...

Autodesk Civil Engineering Solutions User Group of Southern California

You can join this squadron of novice, intermediate, and elite users of:

Civil 3D
Land Desktop
Civil Design
Survey
Raster Design
Map
AutoCAD

We can all see this group get off the ground together (Thursday, Oct. 5 @ 5:30pm) and attendees can help pilot its formation. I am also looking forward to meeting Pete Kelsey at the first meeting. Who is Pete Kelsey? You don't know. You will.

Click on any of the links to register.

Monday, July 31, 2006

Point Label Size Workaround

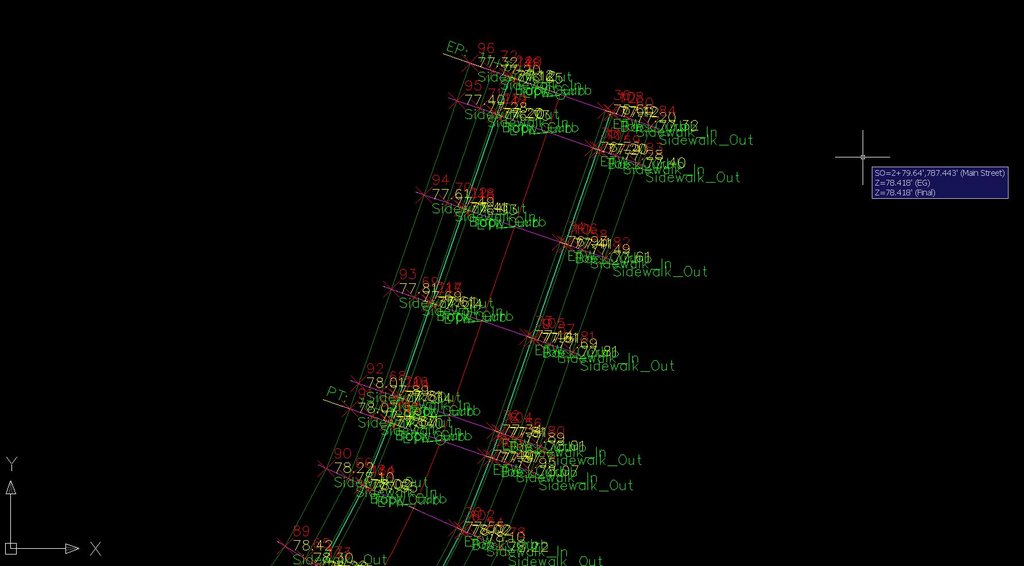
In Land Desktop whenever we encountered a scenario like the following image...

where points markers and/or point labels overlapped we could insert the points in such a ways so as they resize themselves to a percentage of the screen size.

Gregory Newland recently asked in the Civil 3D Discussion Group if he could get the same type of reaction from Civil 3D. He was pointed to a style setting...


that would allow him to get similar behavior from the point markers, but not the points labels (see image).


Well, Gregory came up with a workaround. He found that if he maximizes a viewport while in a layout he would get very similar behavior as to what he was accustomed to from Land Desktop. He could zoom around, do the REGEN command and the point labels would also resize themselves per the current zoom magnification (see image).


This gave him the behavior he sought.

At this point some of you will be asking "How do you maximize a viewport?" Like most things there are many ways. These may include double-clicking or the right mouse button, but, the simplest to remember is to use the "Maximize Viewport" button on the status bar (see image).


Once maximized press this button again to unmaximize.

By the way, it may be a good idea to create a new layout so that you will not accidentally disrupt any existing viewports.

This process is an example of how a little out of the box thinking can provide users with tools, steps, or prcedures that they find useful. Additionally this demonstrates the value of the Discussion Groups. The insight of one (usually gained through blood, sweat, tears and determination) can benefit many.

Thanks Gregory for sharing!

Monday, July 10, 2006

Land Desktop 2007 & Civil Design Companion 2007 Service Pack 1 Available

We have a new co-worker here at KETIV Technologies. While explaining to him some of the checks that we run on computers prior to classroom training, I found, much to my surprise, that Service Pack 1 was available for Land Desktop 2007 and Service Pack 1 was available for Civil Design Companion 2007. I had not noticed them when I checked early Friday.

Some may question why mention a LDt service pack on this blog? This would be a good time to reiterate that we do not recommend immediately getting rid of Land Desktop for Civil 3D. There is a reason that both Civil 3D and Land Desktop are in the Civil 3D box. Users now have two tool boxes available to them in order to handle their design tasks. We do not throw away the first tool box (Land Desktop) when we get the newer, shinier toolbox (Civil 3D). We use whichever tool within whichever toolbox accomplishes our needs better and faster. Most often that will be Civil 3D. But, there are occasions that the better/faster tool may be Land Desktop.

"When?" you may ask. One example may be when needing to build a VERY LARGE surface from a LandXML file. Civil 3D may not be able to handle it and Land Desktop may.

Back to the matter of the Service Packs. In the Readme file for Land Desktop Service Pack 1, it mentions that in order for correct side-by-side use of products the following service packs should be installed:

Service Pack 1 for Land Desktop 2007
Service Pack 1 for Civil Design Companion 2007
Service Pack 1A for Civil 3D 2007.

That is probably enough for now.

Monday, June 19, 2006

Civil 3D 2007 - SP1A On Its Way

Civil 3D 2007 Service Pack 1 seems to correct several issues with the product, but there is one item that it seems to break (there is a work-around, see below).

A couple of users pointed this out to me and there is mention of it in the Discussion Groups also. When you have a Parcel with Labels in ModelSpace everything appears fine. Then when you switch to PaperSpace (a Layout) the Parcels Labels disappers. This is not good.

Dan Philbrick the Autodesk Civil 3D Development Manager mentioned in the Discussion Groups that Service Pack 1A (which corrects this one issue) should be available Wednesday, June 21, 2006.

Workaround: In order to plot properly from a layout you can use either Land Desktop or Land Enabled Autodesk Map.

If I have not stated it lately the Discussion Groups are a GREAT way to...
get questions answered...
find tips, tricks, and workarounds...
see what is causing others issues...
offer advice for the benefit of the industry...
make requests and wishes...
BASICALLY IMPROVE!

Preview Beta of the Autodesk® DGN V8 Translator

Shaun Hurley mentions in his blog that Autodesk is making available this preview beta as of today (June 19th, 2006) for AutoCAD 2007 based software. This is not needed in Civil 3D 2007 Land Desktop 2007, and Map 3D 2007 because they already contain this feature.

Visit Shaun's Blog for instruction on how to acquire the Beta

Friday, June 16, 2006

Civil 3D 2007 - 2 New Hot Fixes

Just released 2 NEW hot fixes for 2007 products.

Hotfix - Fatal Error During Save
Hotfix Cut and Paste

The first, very much applies to Civil 3D 2007. Actually, they are the same fix. Which is to download and install the latest version of acdb17.dll.

If your version is less than 17.0.103.50 you need to download and apply the hotfix.

How do you check the version? Find the file in the program root directory, right click and choose Properties. In the acdb17.dll Properties dialog box select the Version tab. The file version will be specified.

I ultimately applied the fix three times:

AutoCAD 2007 (I have a separate install for this program)
Civil 3D 2007 (not needed if SP1 installed)
Land Desktop 2007